|
|
| Home > Documentation > Apache Geronimo v1.0 - User's Guide > Administration > Administrative tasks |
This article is an attempt to cover as many administrative tasks as possible, common and not so common tasks. This article is grouped in four main sections having a similar flow to what you would find while using the Geronimo Administration Console, this way should be easier for you to familiarize on both tasks and console.
This article is organized in the following sections:
Additional reference:
Covered in this section are the most common, every day, server related administrative tasks you may deal with. Subsequent sections will focus on configuring services, managing applications and configuring security.
When you download and build Apache Geronimo from source code (from svn) you would get a directory structure similar to this one:
If you look under the assemblies directory you will find the following subdirectories:
We will focus on the last two directories that, as you may expect, contain self-contained images of Apache Geronimo configured to use either of these two Web containers.
Depending on whether you want to use Jetty or Tomcat you will change to the respective directory (j2ee-jetty-server or j2ee-tomcat-server), the internal subdirectory structure will be the same. Once in the Web container specific directory, change directory once again to target/geronimo-1.0. This directory is your self-contained, totally complete, Apache Geronimo server. You may copy this directory to a different location. This directory is being referenced as <geronimo_home> throughout these series of articles.
So, selecting the Web container is no longer a matter of changing configuration files but rather choosing a directory structure for the different assemblies. Within this structure you will find a /bin directory, the next section explains the commands located in this directory and how to start and stop the server.
There are two command line ways to start the server. From a command line window or terminal change directory to <geronimo_home>/bin. From there you can either type:
java -jar server.jar
or simply
startup
Refer to the Startup and Geronimo sections for all the options for this command.
To stop the server you will have to open a new command line window or terminal, change directory to <geronimo_home>/bin and run the shutdown command. You will be prompted for username and password. Refer to the Shutdown and Geronimo sections for the available options for this command.
If the server is already running you have the option of using the Geronimo Administration Console to shutdown the server remotely. With the server up and running open a Web browser and point to the following URL to access the console:
Log in to the Geronimo Administration Console and click on  Shutdown on the Console Navigation menul on the left.
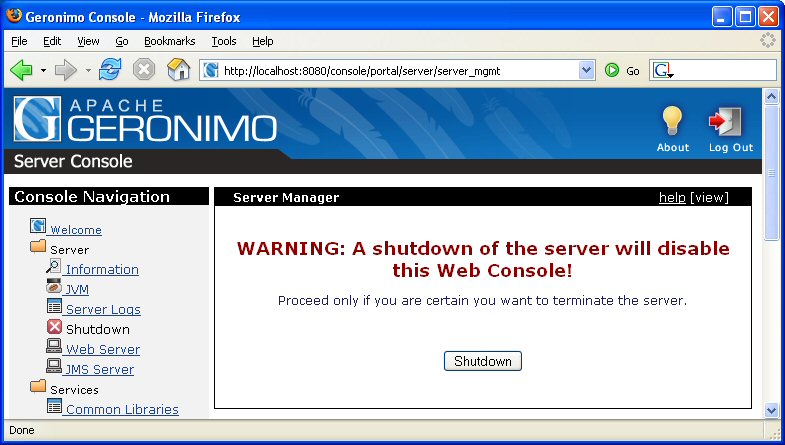
When you click on the Shutdown button in the Server Manager portlet, you will be prompted one more time to confirm the server shutdown. Click OK to confirm and shutdown the server. No need to mention that the connection from the Administration Console will be lost and you will need to restart the server from a terminal or command line window.
As explained in the Geronimo Administration Console section, the Administration Console provides four portlets for configuring and viewing the server's logs, these portlets are the Log Manager, Server Log Viewer, Derby Log Viewer and Web Access Log Viewer.
The Log Manager portlet options are illustrated in the following figure. From this portlet you can specify the location of the log configuration file. By default this value is set to var/log/server-log4j.properties.

Other value you can modify in from this portlet is the Refresh Period. This value tells Geronimo how often (in seconds) it should check for any changes to the configuration file. By default this value is set to 60 seconds.
From this portlet you can also change the Log Level. By default this value is set to INFO, the possible values you can choose from are All, DEBUG, INFO, WARN, ERROR, FATAL, TRACE and OFF.
The Server Log Viewer portlet options are illustrated in the following figure. From this portlet you can view the Geronimo server logs as well as set filters for refining the results displayed.

The Refresh link on the upper left corner will reset any filtering criteria you may have specified to the Geronimo Administration Console's defaults and will display the last 10 lines (if any) of the current Geronimo server log.
The Filter Results: area will let you specify different filtering criteria to further narrowing down your search. The File pull-down menu allows you to select the log file to view. The logs listed in this pull-down menu are ruled by the Configuration File (server-log4j.properties by default) specified in the #Log Manager portlet. The number of log files to choose from the File pull-down menu will depend on the number of log files defined in the server-log4j.properties configuration file.
Lines ..to.. lets you specify a range of line of log to analyze. Max Results limits the number of lines to be displayed. Level displays only those errors occurred for that Log Level. Containing text lets you enter a specific string to search through the server log. With Exceptions by clicking this checkbox will be displayed not just the error but also the exception, the stack trace display will be limited to the number lines set by the Max Results value.
The Derby Log viewer portlet options are illustrated in the following figure. From this portlet you can view the Derby server logs as well as set filters for refining the results displayed.
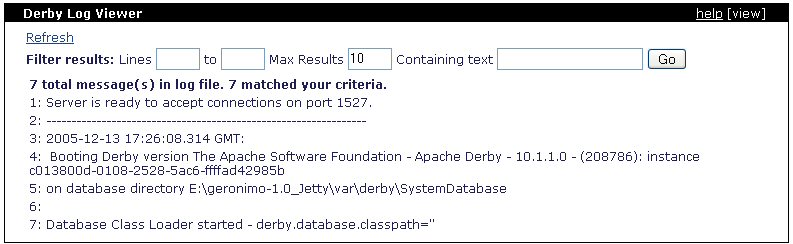
The Refresh link on the upper left corner will reset any filtering criteria you may have specified to the Geronimo Administration Console's defaults and will display the last 10 lines (if any) of the current Derby server log.
Similar to the #Server Log Viewer portlet, the Filter Results: area will let you specify different filtering criteria to further narrowing down your search. Lines ..to.. lets you specify a range of line of log to analyze. Max Results limits the number of lines to be displayed and Containing text lets you enter a specific string to search through the server log.
The Web Access Log Viewer portlet options are illustrated in the following figure. From this portlet you can view the Web server logs as well as set filters for refining the results displayed.
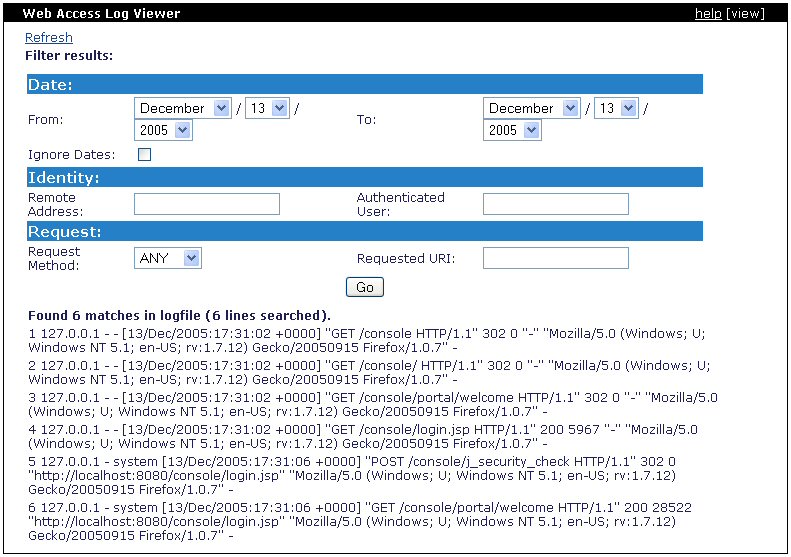
The Refresh link on the upper left corner will reset any filtering criteria you may have specified to the Geronimo Administration Console's defaults. In contrast with the other portlets, the Web Access Log Viewer will display all the lines in the log, it will just be limited by your Web browser display capabilities.
The Filter Results: area will let you specify different filtering criteria to further narrowing down your search. For the Web Access Log Viewer this area is divided in three main groups, Date, Identity and Requests.
For monitoring the Web server performance the Web Server Manager portlet is available by selecting Web Server on the Console Navigation menu on the left hand side. By default this portlet is not enabled, click on the enable button to start collecting statistics.

Once enable you will start collecting information on the number of requests, concurrent connections, requests duration, etc. The following figure illustrates all the values being collected.
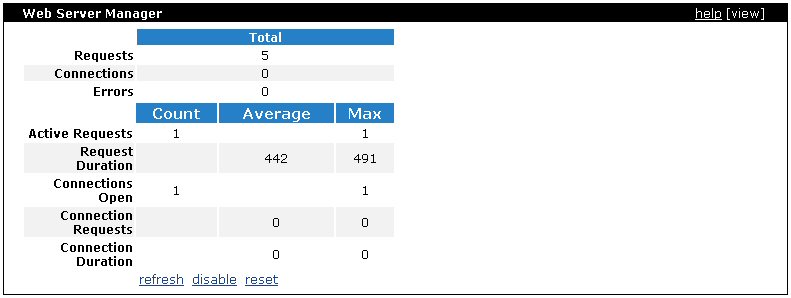
The three links at the bottom let you refresh the current statistics, disable the portlet and stopping the collection of new data and reset the data collected.
Note that any request from you via the Geronimo Administration Console (for example refreshing statistics) will be also reflected in this data collection.
For configuring new listeners (HTTP, HTTPS and AJP) to the Web container in use (either Jetty or Tomcat) the Network Listener portlet is available by selecting Web Server on the Console Navigation menu on the left hand side. From this portlet you can add new listeners as well as change the status (stop, start, delete) of the existing connectors.

The processes described next are the same for both Jetty and Tomcat Web containers.
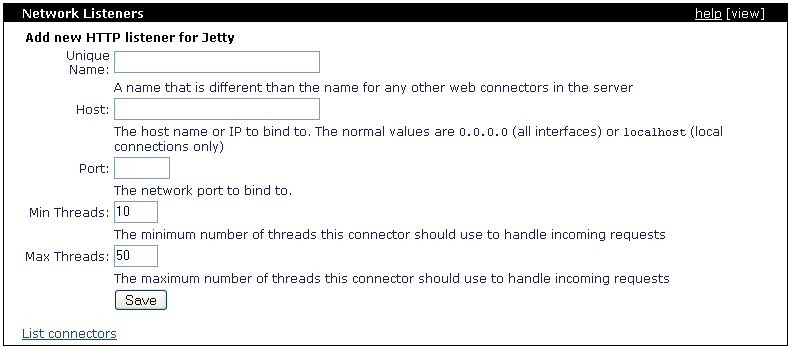
To add a new HTTP listener click on the respective link. The following figure illustrates the different parameters needed for creating a new HTTP listener. This process is very simple and the parameters are self explanatory, fill in with your values and click on Save.
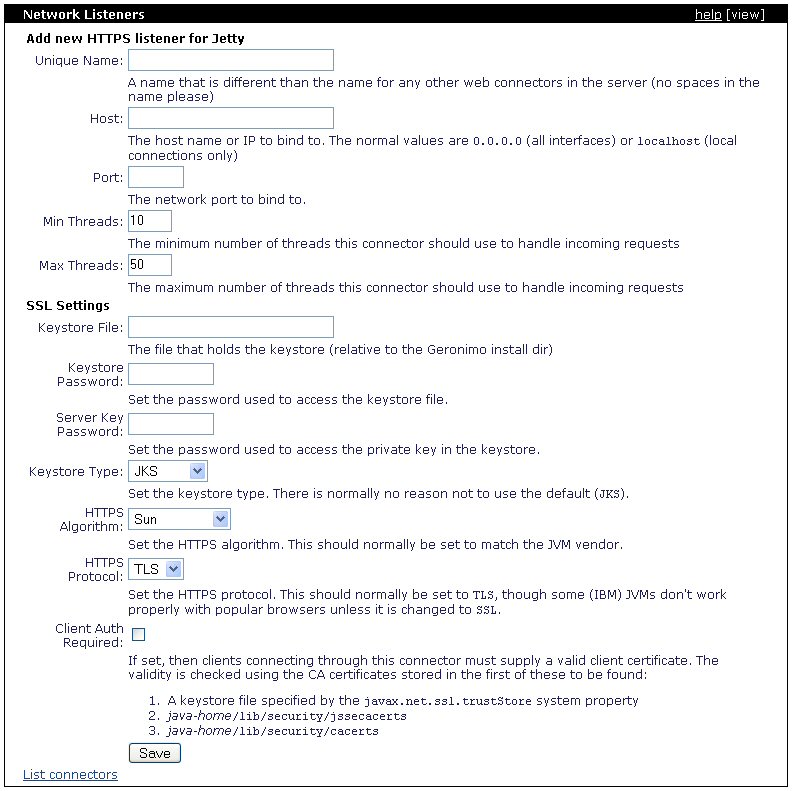
To add a new HTTPs listener click on the respective link. The following figure illustrates the different parameters needed for creating a new HTTPs listener. This process is very simple and the parameters are self explanatory, fill in with your values and click on Save.
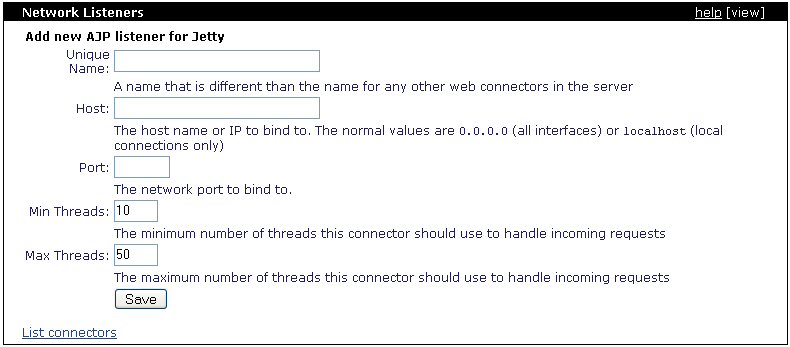
To add a new AJP listener click on the respective link. The following figure illustrates the different parameters needed for creating a new AJP listener. This process is very simple and the parameters are self explanatory, fill in with your values and click on Save.
For configuring the JMS Server, the JMS Network Listeners portlet is available by selecting JMS Server on the Console Navigation menu on the left hand side. When clicking on JMS Server you will be also presented with the JMS Server Manager portlet that displays the JMS brokers available in the server and theis status. The following figures illustrate these two portlets and options.

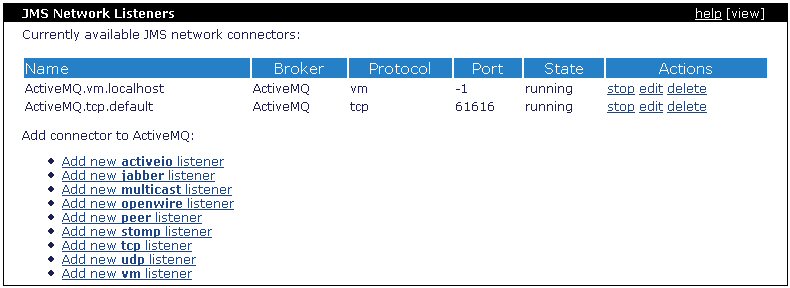
From the JMS Network Listeners portlet you can add new listeners as well as change the status (stop, start, delete) of the existing ones. The available options for adding connectors to ActiveMQ are already shown in the figure.
To add a new connector to ActiveMQ click on the appropriate link. The following figure illustrates the different parameters needed for creating these connectors. This process is very simple and the parameters are self explanatory, fill in with your values and click on Save.
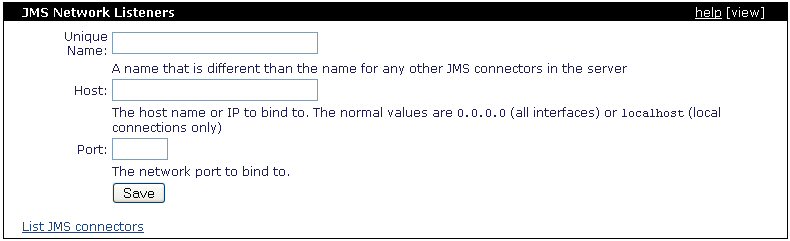
Note that the same options will be presented independently of which listener you want to add.
Details on how to configure connection factories, queues, topics and destinations are covered in the next section #Configuring JMS.
There are three majors tasks covered in this section, this tasks are:
For adding artifacts to the repository the Repository Viewer portlet is available by selecting Common Libraries on the Console Navigation menu on the left hand side. The Repository Viewer portlet illustrated in the following figure displays the artifacts installed in the server's repository. The layout of the repository is the same as that used by Apache Maven making it possible to easily copy files The over.
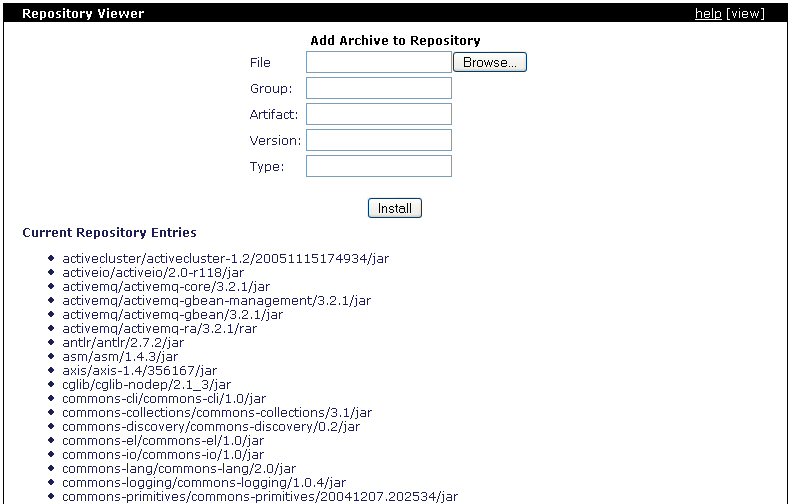
To use an artifact in an application, add a dependency element into it's deployment plan. For example, to use Castor XML add the following XML to the plan:
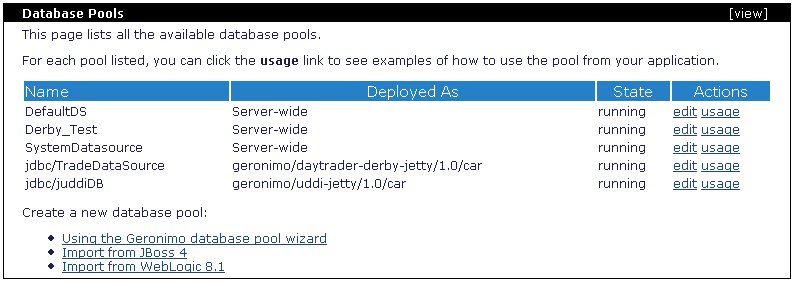
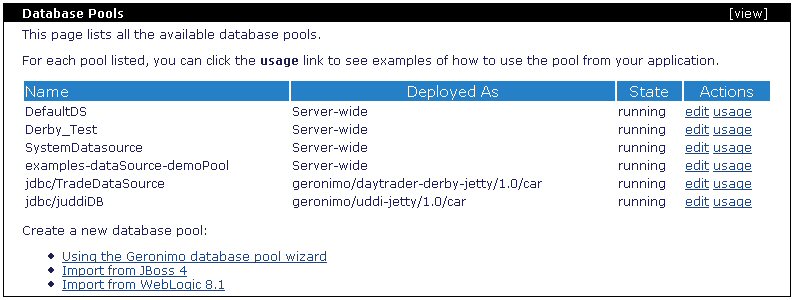
To configure database pools, the Database Pools portlet is available by selecting Database Pools on the Console Navigation menu on the left hand side. The Database Pools portlet illustrated in the following figure shows all the available database pools and provides wizards for importing or creating new pools.
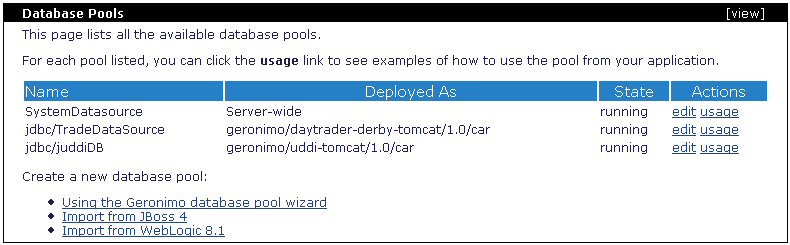
You can create new pools by clicking on the Using the Geronimo database pool wizard link on the Database Pools portlet. This wizard will guide you through a four easy steps procedure.
Refer to Configuring DB2 Datasource for an additional working example on datasources with multiple jar (driver+license) files.
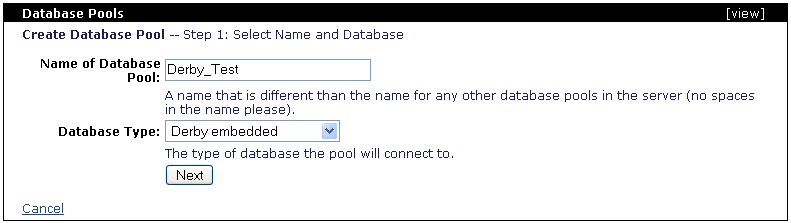
First you need to specify the name of the database pool and the database type.
Then you select the JDBC drivers which, by default, it has been pre-filled based on the database type you selected in the previous step. You also have to select the driver JAR from the pull-down menu and then specify the database name. For this example a test database was previously created, this is a single step procedure and it is explained in #Create a database.
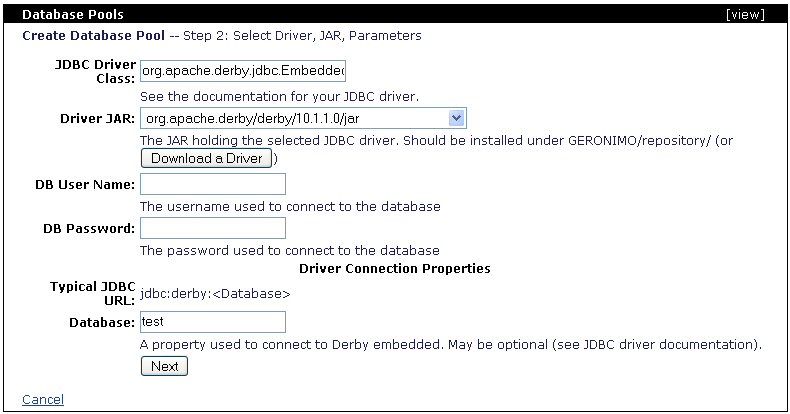
The following step lets you configure some connection parameters such as pool size (min and max) and timeouts. Once you are satisfied with the paramenters click on Test Connetion.
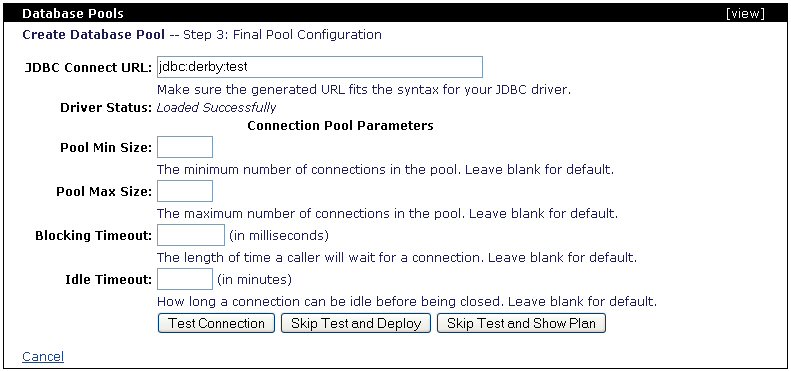
When you successfully tested the connection, click on Deploy Pool. Alternatively you can click on Show Deployment Plan, this option shows you the deployment plan for this database pool and lets you edit it. Additional instructions on how to manually deploy a DB plan may be found in the Configuring DB2 Datasource section.

Once deployed, Derby_Test should be listed along with all the other database pools.
This wizard will assist you in importing existing JBoss 4 database pools. For this particular example we will use the hsqldb-ds.xml provided by the default JBoss server, that is <jboss_home>\server*default*\deploy\hsqldb-ds.xml and Hypersonic database.
Before we continue you will have to provide Geronimo with the driver jar for Hypersonic HSQL. To do that you will have to follow similar steps as described in Configuring DB2 Datasource. Here is the steps summary for declaring the HSQL driver jar in Geronimo.
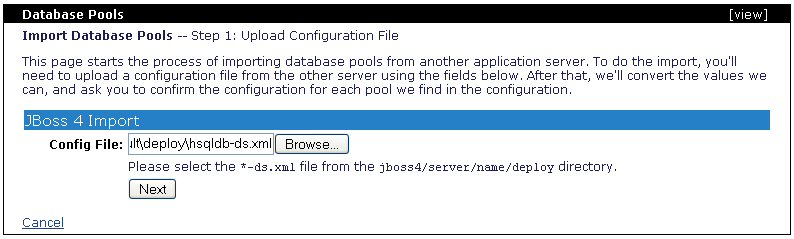
hsqldb.jar. This file is located in the <jboss_home>\server\default\lib directory. Make a copy of this file and rename it to hsqldb-1.8.0.jar.Go back to the Geronimo Administration Console and click on the Database Pools link. From the Database Pools portlet click on Import from JBoss 4. In the Step 1 of Importing the Database Pools specify the location of the -ds.xml file and click Next.
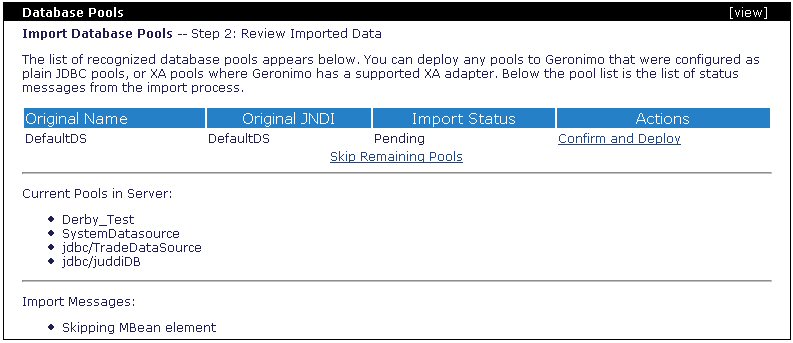
Once the JBoss specific datasource is loaded, Step 2 lists the database pools the wizard was able to recognize from the hsqldb-ds.xml file. Click on Confirm and Deploy.
The following step allows you to edit the recognized database pool. In this step you will have to specify the driver jar you declared when updating the Geronimo repository. See how Driver JAR: is listed in the following figure.
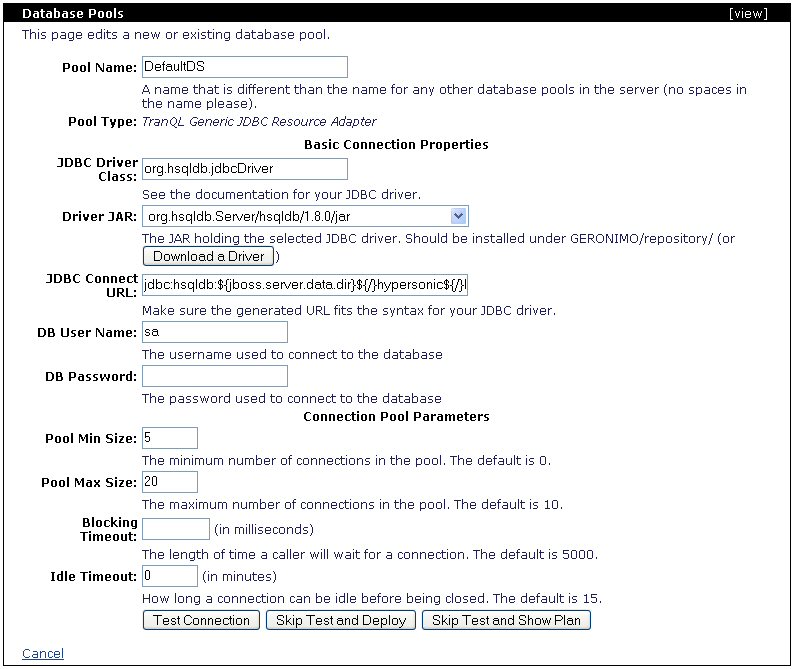
Click on Test Connection to verify you entered all the necessary data and Geronimo can establish a connection.

Click on Deploy, this will take you to the same page you saw in Step 2. If you would have more pools defined in the file you could repeat these steps and selectively import some of the database pools. Since we only have one in this example you may click on Finish to complete the import wizard.
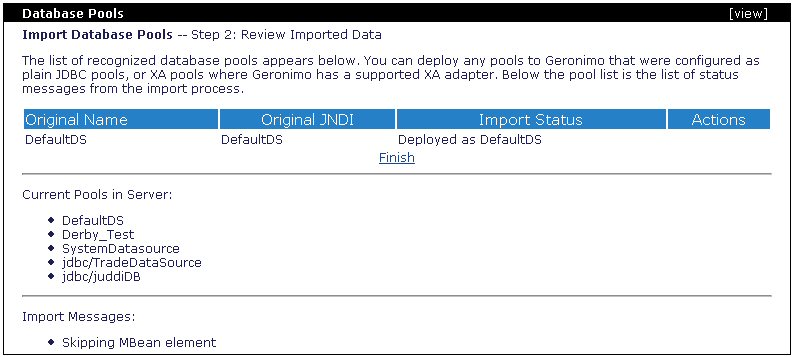
You should now see the imported DefaultDS database pool.
This wizard offers two different alternatives for importing existing BEA WebLogic database pools. The first one is by providing a configuration file (i.e. config.xml). If you choose for this option the wizard will convert as many fields as it can and then will ask you to manually enter those it was not able to convert. For instance, one of the values you will have to provide is the database password.
The second alternative is feasible if you have both Apache Geronimo and BEA WebLogic servers installed on the same machine, in this alternative you can directly specify the WebLogic installation path and domain directories. This alternative has the advantage of being able to directly read the database passwords.
Independently of the alternative you may choose, you will still need to tell Geronimo where the database driver jars are. Here is the steps summary for declaring the PointBase driver jar in Geronimo.
pbclient44.jar. This file is located in the <bea_home>weblogic81\common\eval\pointbase\lib directory. Make a copy of this file and rename it to pbclient-4.4.0.jar.Go back to the Geronimo Administration Console and click on the Database Pools link. From the Database Pools portlet click on Import from WebLogic 8.1. The following figure illustrates the import wizard.
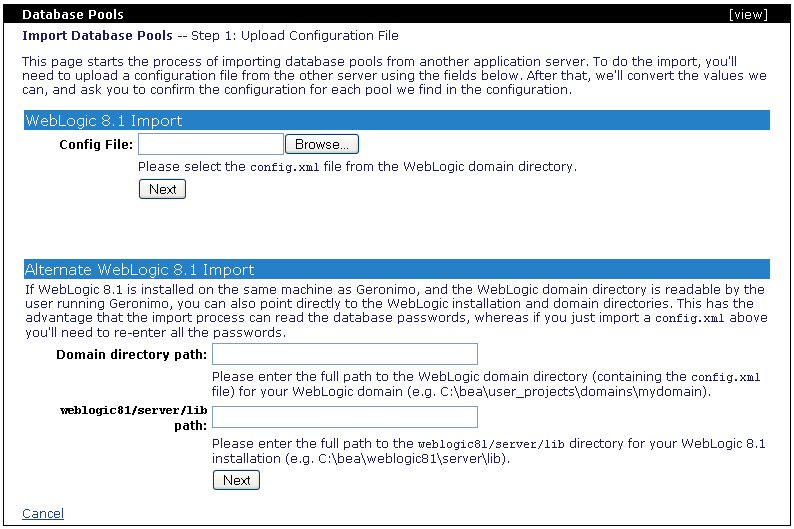
For this particular example we will focus in the second alternative. A default example domain was created in the WebLogic server with all the sample applications also included by default. This domain is located in the <bea_home>\user_projects\domains\examples directory.
In the first screen of the import wizard (illustrated in the above figure) enter the Domain directory path: and weblogic81/server/lib path: and click Next.
Domain directory path: <bea_home>\user_projects\domains\examples
weblogic81/server/lib path: <bea_home>\weblogic81\server\lib
The Step 2 illustrated in the following figure shows a list of recognized database pools from the WebLogic domain you specified that can be imported to Apache Geronimo.
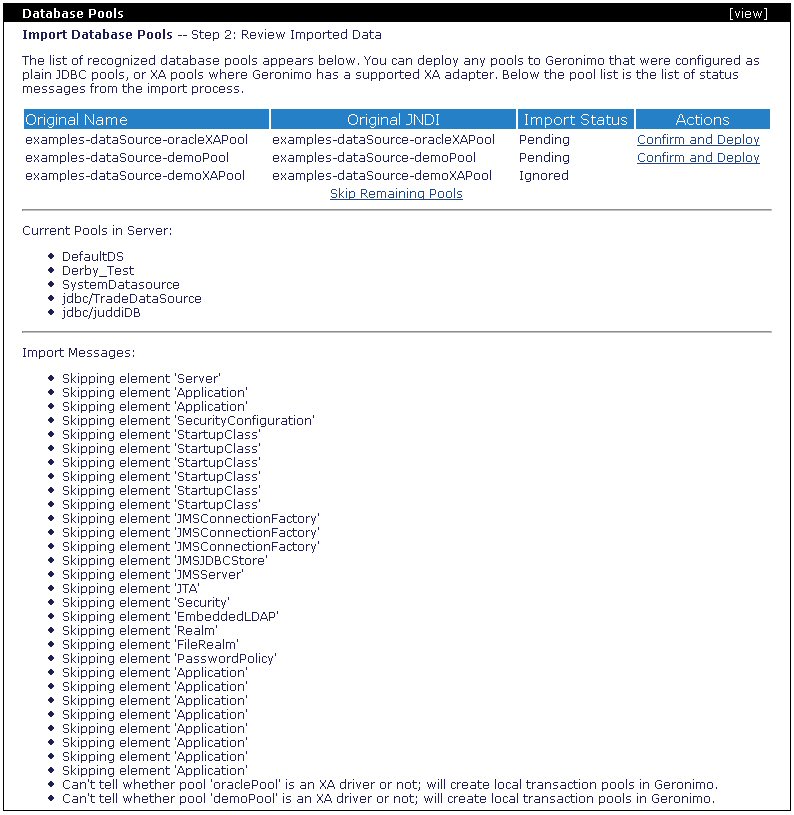
Note that the WebLogic domain you are trying to import the database pool from must be running if you want to successfully test the connection. For this example click on the second Confirm and Deploy from the list, the one corresponding to examples-dataSource-demoPool.
In the following step select the Driver JAR: you just created in the Geronimo repository.
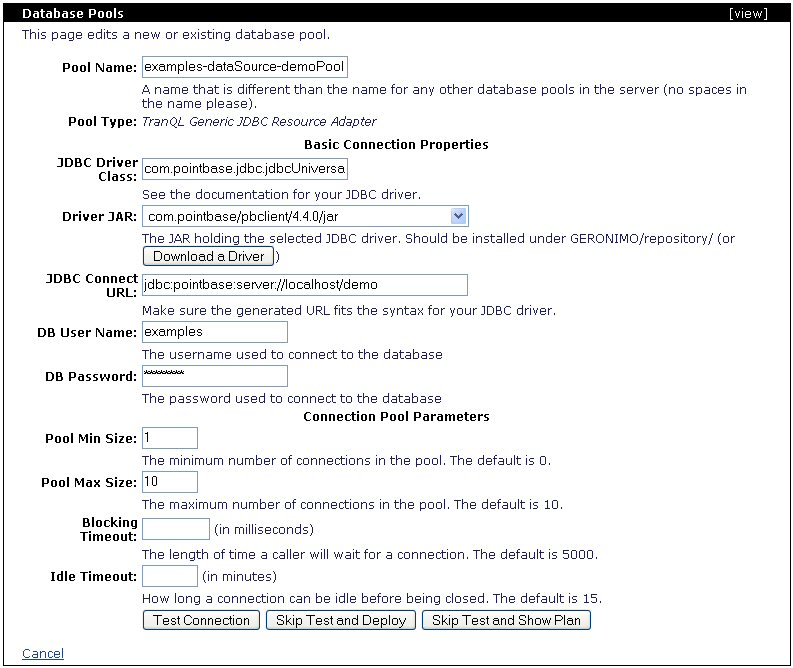
Note that the database password has been recognized. Click on Test Connection, you should see a confirmation similar to the following figure. Click on Deploy.

The following page goes back to the Step 2, this time it will display the remaining database pools available for import and will also show the import status of the database pool you just imported. At this point you can click on Skip Remaining Pools to leave the import wizard.

You should now see the database pool you just imported listed in the database pool portlet.
To remove the database pools you can use the Deployer tool. Among other things, this tool allows you to list the available modules, the pool you just deployed will be listed as a module.
To list all the available modules type the following command:
E:\geronimo\bin>deploy --user system --password manager list-modules | grep user/database

  + user/database-pool-Derby_Test/1/car
For this command example grep was used for display purposes, the use of grep is optional.
Once you identified the database pool (in this example user/database-pool-Derby_Test/1/car) you may remove by typing the following command:
E:\geronimo\bin>deploy --user system --password manager undeploy user/database-pool-Derby_Test/1/car

    Module user/database-pool-DerbyTest/1/car unloaded.

    Module user/database-pool-DerbyTest/1/car uninstalled.

    Undeployed user/database-pool-DerbyTest/1/car
As an additional step for verification the removal of the database pool you can run the following command, there should be no entries listed.
deploy --user system --password manager list-modules | grep Derby_Test
To create a new embedded database in Geronimo the DB Manager portlet is available. Near the bottom of the Console Navigation menu navigate through Misc -> Embedded DB -> DB Manager. This portlet trigers the DB Viewer and Run SQL portlets illustrated in the following figures.


The DB Viewer portlet displays all the available databases, their tables (application and system) and displays the contents of the tables.
The RunSQL portlet allows you to run SQL commands to create or delete databases and to modify the content of the tables. This portlet provides pull-down menus for selecting the database to which you want to run the command against.
To create a test database specify test in the Create DB: field and click on Create. After a few seconds you should see a confirmation message near the bottom of the Run SQL portlet stating Database created: test. You should now see the test database entry in the DB Viewer portlet.
If you want to run any SQL command on this database make sure you select test from the Use DB: pull-down menu, enter the SQL command and then click on the Run SQL button. The results of the command will be displayed near the bottom of the protlet.
To configure JMS, the JMS Connection Factories and JMS Destination Manager portlets are avaiable by selecting JMS on the Console Navigation menu on the left hand side. The JMS Connection Factories portlet illustrated in the following figure displays all the JMS connectors that are configured in the Geronimo server and allows you to add a new JMS Connection Factory.

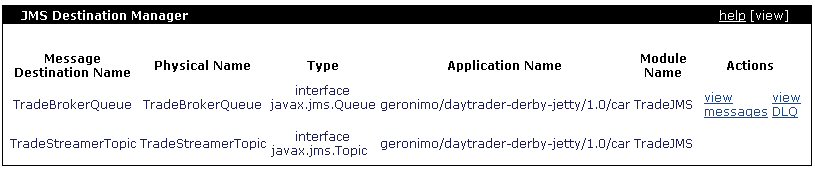
The JMS Destination Manager portlet lists all the queues and topics that are configured in the Geronimo server.
In Apache Geronimo v1.0 these portlet are not totally implemented and you will need to create deployment plans and command line tools to deploy these configurations. Additional details for configuring JMS and integration are covered in the Integrating A Third Party JMS Provider section.
This section focuses on the available alternatives for managing applications. This section will show you how to perform these application management activities using both Geronimo Administration Console and command line options. For the examples shown in this section we will be using the HelloWorld.war sample application created in the Quick start - Apache Geronimo for the impatient section.
To perform these activities you currently have three options available, these options are using:
When you package your application you may include the deployment plan within the package or not. At deployment time, Geronimo will look for the geronimo-web.xml and web.xml deployment plans in the WEB-INF directory within you packaged application. If Geronimo can not find those descriptors it will attempt to deploy the application using defaults. If using defaults fails you will have to provide a deployment plan either repackaged in the application or providing an external deployment plan, in the following sections we will discuss further these alternatives.
To install a new application via the Geronimo Administration Console the Install New Applications portlet is available by selecting Deploy New on the Console Navigation menu on the left hand side. This portlet also allows you to start automatically the application right after it was deployed.

As mentioned before, for this example we will be using the simple JSP HelloWorld sample created in the Quick start - Apache Geronimo for the impatient section. This sample has already included in the package the deployment plans.
From the Install New Applications portlet click on Browse to specify the path to the HelloWorld.war in the Archive: section. Make sure the Start app after install checkbox is selected (by default is checked) and then click on Install.
You should see the " The application was successfully deployed. " confirmation message on the top of the portlet.
Another way to verify that the application has been successfully installed and started is by checking the Installed Web Applications portlet which is available by selecting Web App WARs on the Console Navigation menu on the left hand side. You should see the application listed as HelloWorld and with the status running.
Since the application we installed is HelloWold.WAR we use this portlet, when you install an EAR you would check the status using the Installed Application EARs portlet available by selecting Application EARs on the Console Navigation menu on the left hand side. The installation procedure is the same for both WAR and EAR applications.
To remove the applications through the Geronimo Administration Console you will use these last two portlets, either the Installed Web Applications or the Installed Application EARs portlets depending on the application to uninstall.
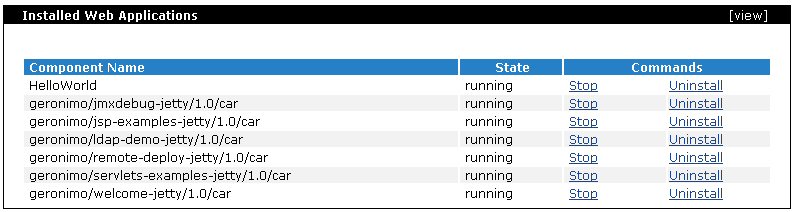
For our example access the Installed Web Applications portlet, and click on Uninstall for the Component Name HelloWorld. This will stop the application first and then uninstall it. The confirmation message " Uninstalled application " should be listed at the bottom of the portlet.
These are the basic steps for installing and uninstalling applications via de Geronimo Administration Console, the following two sections will focus on the command line options.
The deployer tool will allow you, among other things, install and uninstall applications via a command line. In this section we will focus on just these two tasks for the sample application, this tool is fully covered in the Deployer tool section.
To deploy the HelloWorld.war sample application using the Deployer tool open a command line window and type the following command from the <geronimo_home>\bin directory:
deploy --user system --password manager deploy <app_home>\HelloWorld.war
Once deployed you should see a confirmation message similar to this one:
E:\geronimo-1.0_Jetty\bin>deploy --user system --password manager deploy ..\..\HelloWorld\HelloWorld.war
    Deployed HelloWorld @ http://hcunico:8080/hello
As a difference from the deployment via de Geronimo Administration Console, using the command line tool you receive more information in the confirmation message. For instance you receive the Component Name (a.k.a. ConfigId) and you also receive the context root where the application was deployed. This is very usefull when isntalling, testing and uninstalling several different applications where it would be hard to remember all these values.
You can also use the Deployer tool to list all the installed applications. The list-modules command allows you to list all the applications, it also lets you narrow down the query by asking for just the started or stopped applications. The list-modules command without additional parameter will list by default all the started applications.
To uninstall an application you may want to list it first to get the right Component Name (or ConfigId). Run the following command from the <geronimo_home>\bin directory:
deploy --user system --password manager list-modules
You will receive a list similar as the one shown in the following example.
E:\geronimo-1.0_Jetty\bin>deploy --user system --password manager list-modules
Found 36 modules
  + geronimo/remote-deploy-jetty/1.0/car @ http://hcunico:8080/remote-deploy
  + geronimo/ldap-demo-jetty/1.0/car @ http://hcunico:8080/ldap-demo
  + geronimo/activemq-broker/1.0/car
  + geronimo/j2ee-server/1.0/car
  + geronimo/jetty-deployer/1.0/car
  + geronimo/welcome-jetty/1.0/car @ http://hcunico:8080/
  + geronimo/ldap-realm/1.0/car
  + geronimo/uddi-jetty/1.0/car
      `-> uddi-jetty @ http://hcunico:8080/juddi
      `-> uddi-db
  + HelloWorld @ http://hcunico:8080/hello
  + user/database-pool-examples-dataSource-demoPool/1/car
  + user/database-pool-Derby_Test/1/car
  + user/database-pool-DefaultDS/1/car
  + geronimo/activemq/1.0/car
  + geronimo/directory/1.0/car
  + geronimo/j2ee-security/1.0/car
  + geronimo/j2ee-deployer/1.0/car
  + geronimo/hot-deployer/1.0/car
  + geronimo/system-database/1.0/car
  + geronimo/jmxdebug-jetty/1.0/car @ http://hcunico:8080/debug-tool
  + geronimo/j2ee-system/1.0/car
  + geronimo/jsp-examples-jetty/1.0/car @ http://hcunico:8080/jsp-examples
  + geronimo/rmi-naming/1.0/car
  + geronimo/jetty/1.0/car
  + geronimo/servlets-examples-jetty/1.0/car @ http://hcunico:8080/servlets-examples
  + geronimo/daytrader-derby-jetty/1.0/car
      `-> daytrader-web-1.0.war @ http://hcunico:8080/daytrader
      `-> daytrader-ejb-1.0.jar
      `-> daytrader-streamer-1.0.jar
      `-> daytrader-wsappclient-1.0.jar
      `-> TradeDataSource
      `-> TradeJMS
  + geronimo/geronimo-gbean-deployer/1.0/car
  + geronimo/webconsole-jetty/1.0/car
      `-> geronimo-console-standard-1.0.war @ http://hcunico:8080/console-standard
      `-> geronimo-console-framework-1.0.war @ http://hcunico:8080/console
    geronimo/client-system/1.0/car
    geronimo/j2ee-corba/1.0/car
    geronimo/daytrader-derby-jetty-streamer-client/1.0/car
    geronimo/javamail/1.0/car
    geronimo/online-deployer/1.0/car
    geronimo/client-security/1.0/car
    geronimo/client-corba/1.0/car
    geronimo/client/1.0/car
    geronimo/shutdown/1.0/car
Look for the HelloWorld entry, thas is the value you will have to use when trying to uninstall the application.
To uninstall the application run the following command from the <geronimo_home>\bin diretory using the Component Name you identified while listing the modules.
deploy --user system --password manager undeploy HelloWorld
This command will first stop the runnning application and then uninstall it. You should see a confirmation message similar to this:
E:\geronimo-1.0_Jetty\bin>deploy --user system --password manager undeploy HelloWorld
    Module HelloWorld unloaded.

    Module HelloWorld uninstalled.

    Undeployed HelloWorld
In this example you have used the same tool with three different commands:
These are not the only options and commands available for this tool, please visit the Deployer tool section for additional details.
Apache Geronimo has support for Hot Deployment. This means that you can copy an application JAR file into the <geronimo_home>/deploy directory and the application will be deployed automatically. This will also work for uninstalling or refreshing applications previously deployed via this method. Alternatively, you may also copy the directory (umpacked) for the application module instead of copying a single JAR file.
Note that with this deployment method you have to include the deployment plan in the application package, this method does not support external deployment plans. Also note that applications deployed via the Deployer tool or the Geronimo Administratio Console will not be listed in the <geronimo_home>/deploy directory.
When you copy an application in the deploy directory, let's say HelloWorld.war, you will see a confirmation message in the console where Geronimo is running stating the application was deployed and the context to access that application.
11:50:22,501 INFO  [Hot Deployer] Deploying HelloWorld.war
    Deployed HelloWorld @ http://hcunico:8080/hello
To remove the application, just delete the WAR or EAR file from the deploy directory. When the application has been removed you should see a confirmation message in the console where Geronimo is running stating the application was undeployed.
11:57:33,451 INFO  [Hot Deployer] Undeploying HelloWorld.war
    Undeployed HelloWorld
You can change the status of an application in two different ways. You can use the Deployer tool or the Geronimo Administration Console.
As mentioned before, the Deployer tool has many commands. So far we have explored mainly deploy and undeploy and very briefly list-modules. This section is going to focus on the latter command to retrieve the name of the module we want to change the status and will introduce two new commands, start and stop. Later we will discuss the use of the Geronimo Administration Console as the alternative method.
The list-module command accepts the following tree parameters:
This is usefull to identify the status of a particular module and the module ID itself. We will use this command to identify the HelloWorld application and change it's status.
From a command line window run the following command from the <geronimo_home>\bin directory to list all the modules:
deploy --user system --password manager list-modules
You will receive a list of all the modules installed on the server. Note that the started modules are differenciated by a + sign on the left and are displayed first in the list.
E:\geronimo-1.0_Jetty\bin>deploy --user system --password manager list-modules
Found 35 modules
  + geronimo/j2ee-deployer/1.0/car
  + geronimo/webconsole-jetty/1.0/car
      `-> geronimo-console-standard-1.0.war @ http://hcunico:8080/console-standard
      `-> geronimo-console-framework-1.0.war @ http://hcunico:8080/console
  + geronimo/welcome-jetty/1.0/car @ http://hcunico:8080/
  + geronimo/jetty-deployer/1.0/car
  + geronimo/directory/1.0/car
  + geronimo/ldap-realm/1.0/car
  + user/database-pool-examples-dataSource-demoPool/1/car
  + user/database-pool-DefaultDS/1/car
  + geronimo/j2ee-system/1.0/car
  + geronimo/activemq/1.0/car
  + geronimo/j2ee-server/1.0/car
  + HelloWorld @ http://hcunico:8080/hello
  + geronimo/ldap-demo-jetty/1.0/car @ http://hcunico:8080/ldap-demo
  + geronimo/jetty/1.0/car
  + geronimo/geronimo-gbean-deployer/1.0/car
  + geronimo/jsp-examples-jetty/1.0/car @ http://hcunico:8080/jsp-examples
  + geronimo/rmi-naming/1.0/car
  + geronimo/servlets-examples-jetty/1.0/car @ http://hcunico:8080/servlets-examples
  + geronimo/remote-deploy-jetty/1.0/car @ http://hcunico:8080/remote-deploy
  + geronimo/system-database/1.0/car
  + geronimo/j2ee-security/1.0/car
  + user/database-pool-Derby_Test/1/car
  + geronimo/activemq-broker/1.0/car
  + geronimo/jmxdebug-jetty/1.0/car @ http://hcunico:8080/debug-tool
  + geronimo/hot-deployer/1.0/car
  + geronimo/uddi-jetty/1.0/car
      `-> uddi-jetty @ http://hcunico:8080/juddi
      `-> uddi-db
    geronimo/client-system/1.0/car
    geronimo/online-deployer/1.0/car
    geronimo/client-corba/1.0/car
    geronimo/daytrader-derby-jetty-streamer-client/1.0/car
    geronimo/client-security/1.0/car
    geronimo/shutdown/1.0/car
    geronimo/client/1.0/car
    geronimo/javamail/1.0/car
    geronimo/j2ee-corba/1.0/car
Our taget now is "+ HelloWorld @ http://hcunico:8080/hello " , this module's status is started since there is a + on the left. Alternatively, you can run the following command to list just the started modules:
deploy --user system --password manager list-modules --started
To stop the HelloWorld module type the following command:
deploy --user system --password manager stop HelloWorld
You will receive a confirmation message that the module has been stopped.
When you list all the stopped modules you should now see added to the list the HelloWorld module. See the command and results in the following example.
E:\geronimo-1.0_Jetty\bin>deploy --user system --password manager list-modules --stopped
Found 10 modules
    geronimo/client-system/1.0/car
    geronimo/online-deployer/1.0/car
    geronimo/client-corba/1.0/car
    geronimo/daytrader-derby-jetty-streamer-client/1.0/car
    HelloWorld
    geronimo/client-security/1.0/car
    geronimo/shutdown/1.0/car
    geronimo/client/1.0/car
    geronimo/javamail/1.0/car
    geronimo/j2ee-corba/1.0/car
To start the modules just use start instead of stop.
As an alternative to the command line option you can use the Geronimo Administration Console to change the status of the modules. Open the Geronimo Administration Console and navigate to Applications on the Console Navigation menu on the left hand side. There you will find Application EARs and Web App WARs, depending on the type of application you want to change the status, you will choose either Application EARs or Web App WARs. For this example we will continue to use HelloWorld.war as the sample application, hence we will select Web App WARs.
We used this portlet earlier to install and remove applications via the console. From this same portlet you can also change the status of the applications. The avaialable commands within the portlet will change depending on the status for each application. If the application is in running status (started), only the command Stop will be displayed. If the application is stopped, only the command Start will be displayed. The Unninstall command will always be displayed independently of the status of the application. To change the status of the application just click on the command (Start or Stop).
This section covers some common security related taks such as adding and removing users and groups, dealing with digital certificates and increasing the security level by using different realms and authentication methods. Refer to the Security section for further details on how security is implemented in Apache Geronimo.
You can add users and groups via the Geronimo Administration Console or by modifying some configuration files. We will start simple by using the realm provided by Geronimo by default. Then, as we explore the different realms and security configurations, we will come back and revisit some of the topics as needed.
To manage users and groups via the Geronimo Administration Console the Console Realm portlet is avaiable on the Console Navigation menu on the left hand side. Here you will find two portlets, one for administering users and another for administering groups and illustrated in the following figures.


To change a user's password click on the user in the Console Realm Users portlet, it will bring up the UserID and Password so you can update that profile.
To add a new user click on Create New User, you will be prompted for a UserID and Password (twice), enter those values and click Add.
To remove a user click on the corresponding Delete, you will be prompted to confirm deletion of that user, click OK.
Once you created new users you can add them to group. By default, the group admin is available and the user system is in that group. If you click on the admin group you will see the user system in the window on the right and any other available user will be listed in the window on the left.
To add a new user to this group select the user first, then click Add >> and then click Update.
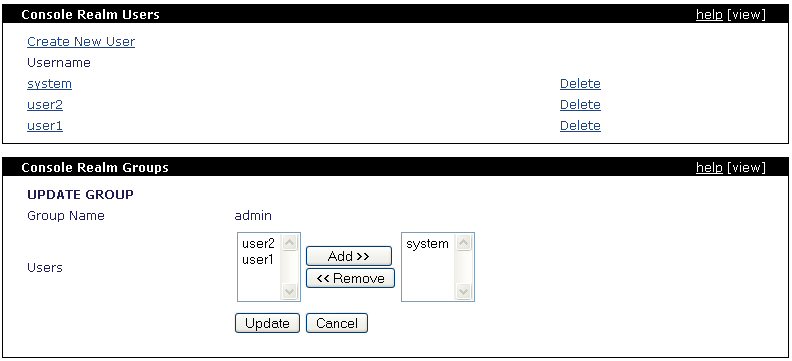
To create a new group click on Create New Group, this step is very similar to the previous one. In addition to be prompted for adding users to this group you will also have to provide a group name. When you entered entered the new group name and added the users click on Add to finish.
The changes you made via the Console Realm Users and Console Realm Groups portlets are reflected in two different files, these files are users.properties and groups.properties respectively and they are located in the <geronimo_home>\var\security directory.
When you delete a user from the console, that user will not be removed from the group it belonged to. The Console Realm Users portlet will not modify the groups.
You can equally administer users and groups by modifying directly these files:
users.properties
groups.properties
users.properties uses the <user_name>=<password> format, groups.properties uses the <group_name>=<user_name> format. See the following examples for additional details.
system=manager
user2=p2
user1=p1
As we are using the basic, by default, security configuration you will see the user IDs and passwords are stored in plain text. You can add, remove and change passwords from this file.
admin=system,user1
users=user2
Just like with the users, with the groups.properties you can add and remove groups and users to those groups.
The files mentioned in this sections along with the all the security configuration in addition to user names and passwords are defined in the geronimo-properties-realm security realm covered in the following section.
Before we move on, it is recommended for you to become familiar with the Geronimo security architecture and concepts. Visit the Security section for details on how security is implemented in Geronimo. The two main Security concepts on which the Apache Geronimo security architecture is built on are Login Domain and Security Realm, in this section we will focus on the later.
To administer security realms via the Geronimo Administration Console the Security Realms portlet is available on the Console Navigation menu on the left hand side. This portlet allows you to add a new security realm or edit an existing one. To remove realms you would normally use the command line option with the Deployer tool.
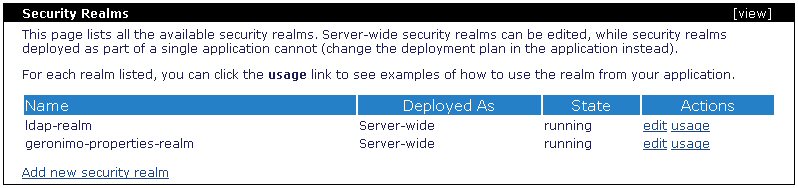
Listed in this portlet you will find all the available security realms. By default, the security realm used by Geronimo to authenticate users via properties file is geronimo-properties-realm.
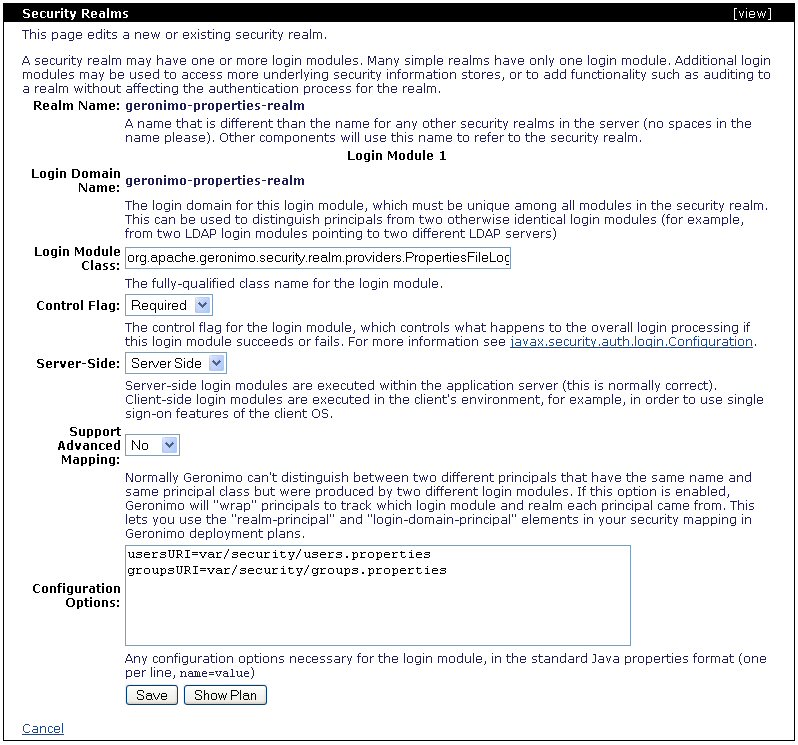
When you edit an existing realm (in this case geronimo-properties-realm) you will be presented with the following screen, note that you will not be able to change the realm name nor the login domain name.
The following example illustrates the deployment plan generated by this portlet.
As we mentioned before, this plan is for the default, properties file based, security realm. When you create a new realm you will have to choose from the following realm types available:
The last available option lets you create your custom realm type when none of the above fits your environment needs.
Apache Geronimo has a properties file realm already configured, this is the default realm used for authentication. Geronimo also comes with a set of sample applications, one of those applications provide an additional security realm for LDAP. For this example, we will focus on a different type, we will use a database for verifying and retrieving user names and passwords.
For this example we created a new database called SecurityDatabase using the built-in Derby database. The following steps summarize the procedure followed to create the database and tables, load some sample data and create the connection pool. Detailed instructions on how to define database connection pools are described in the #Configuring database pools section.
create table users(username varchar(15),password varchar(15));create table groups(username varchar(15),groupname varchar(15));insert into users values('userone','p1');insert into users values('usertwo','p2');insert into users values('userthree','p3');insert into groups values('userone','admin');insert into groups values('usertwo','admin');insert into groups values('userthree','user');To create a new security realm click on Add new security realm from the Security Realms portlet.
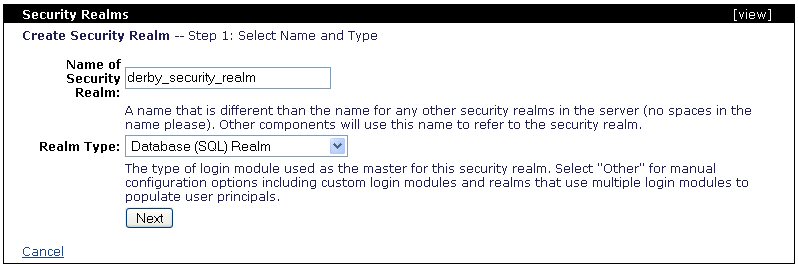
Enter derby_security_realm in the Name of Security Realm: field and select Database (SQL) Realm from the Realm type: pull-down menu and click Next.
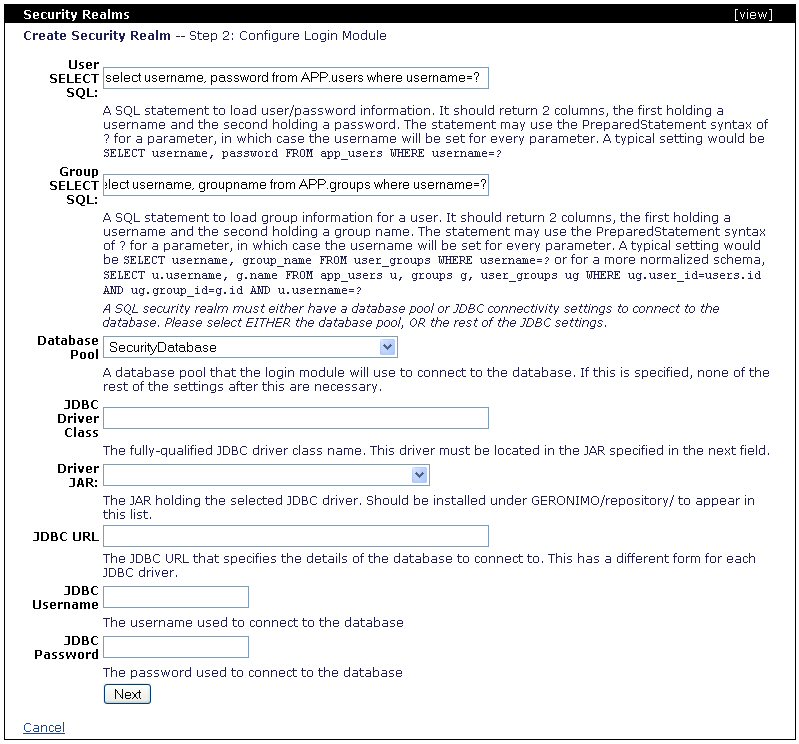
The following screen configures the login module. The first two field you need to fill will potentially vary from one database type to another. In this case we are using the embedded Derby database so the User and Group select SQL should read as follows:
User SELECT SQL: select username, password from APP.users where username=?
Group SELECT SQL: select username, groupname from APP.groups where username=?
Note that APP is the default schema for the embedded Derby database and it needs to precede the table in the SQL statement. These statements are likely to be different from one database to another, for instance this procedure was also tested with DB2, the SQL statements used were:
User SELECT SQL: select username, password from users where username=?
Group SELECT SQL: select username, groupname from groups where username=?
Once you entered the SQL statements for retrieving users and groups you need to select from the Database Pool pull-down menu the database connection pool you created in the previous step ( #Create connection pool) and click Next.
The remaining fields are no necessary to fill since that information is already provided by the database conneciton pool. If you are not using predefined database connection pools you will need to fill-in all the fields.
The following step will allow you to enable auditing for monitoring the login attempts via this realm. In this step you can also configure the account lockout based on the number of failed loging attempts withing a specified timeframe. The last option in this step, Store Password, when enabled will allow the realm to store the user password in a private credential in the subject.
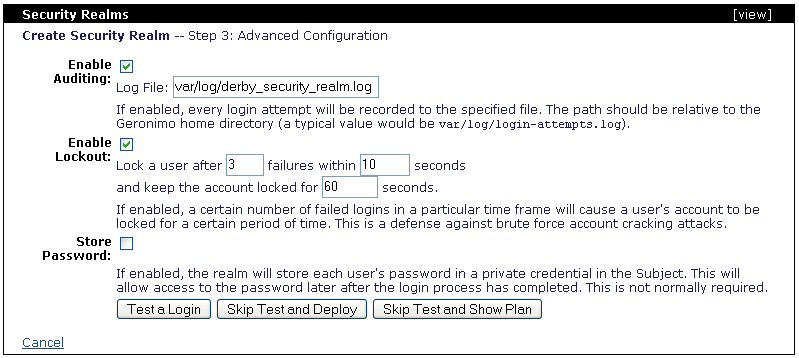
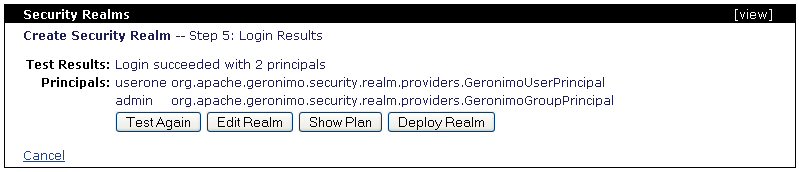
At this point you have configured this new security realm, the next step i to test it and then deploy it. Click on Test a Login.
Enter a valid user name and password to be retrieved from the database and click Next.
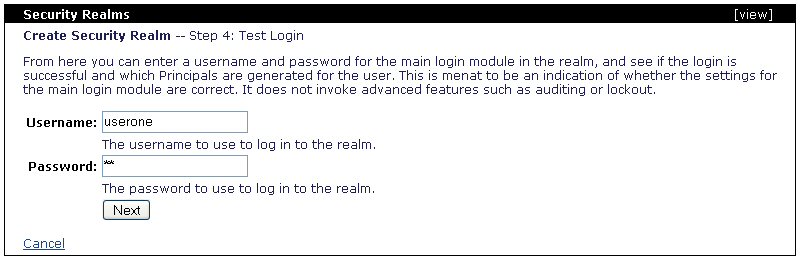
You should receive a confirmation message that the login succeded, click on Deploy Realm to load this configuration to the server.
Now you have a new, fully configured, security realm that retrieves user names and passwords from the build in Derby database.
The followig example shows the deployment plan for this security realm. As an alternative to the Geronimo Administration Console, you can save this example to a file (i.e. derby_security_realm.xml) and deploy it with the Deployer tool by running the following command:
<geronimo_home>\bin\deploy --user system --password manager deploy <realm_path>\derby_security_realm.xml
If you want to quickly test this realm you can use the LDAP sample application covered in the Configuring LDAP section. You will just need to change the deployment descriptor geronimo-web.xml to the one shown in the following example, repackage the application and deploy it.
Note that we only changed from the original plan the realm name from ldap-realm to derby_security_realm.
Follow the instructions in the Configuring LDAP section to repackage and deploy the application. When you test it, this time you will using the database SQL realm. Give it a try a few times, you should see the successful login attempts recorded in the log file you specified when created this security realm (in this example var\log\derby_security_realm.log)
03/01/2006 15:56:33 - Authentication attempt - userone
03/01/2006 15:56:33 - Authentication succeeded - userone
03/01/2006 16:10:05 - Authentication attempt - usertwo
03/01/2006 16:10:05 - Authentication succeeded - usertwo
To administer SSL certificates the Keystore Configuration portlet in available by selecting Keystore on the Console Navigation menu on the left hand side. From this portlet you can either import an existing certificate or create a new certificate request.

The certificates in Geronimo are stored in a keystore located in <geronimo_home>\var\security\ssl-keystore-1. This ssl keystore file does not exist until you create the first private key.
If you already have a certificate you can click on import trusted certificate.
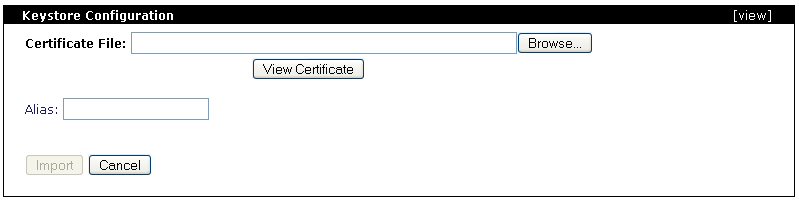
Specify the location of the certificate file and click View Certificate. The certificate information will be displayed, you may add an alias to identify this certificate, when done click on Import to add that certificate to the keystore. You should now see that the keystore size has increased.
To generate a key click on generate key pair. In the following screen enter the relevant information and click on Submit. For this example we entered the following values:
Alias: | Geronimo Server |
Key Algorithm: | RSA |
Key Size: | 1024 |
Signature Algorithm: | MD5withRSA |
Validity: | 2000 |
Common Name (CN): | 127.0.0.1 |
Organizational Unit (OU): | Geronimo |
Organizational Name (O): | Apache |
Locality (L): | Locality |
State (ST): | State |
Country (C): | Country |
You should now see that the keystore size has increased and the private key you just created is listed near the bottom of the Keystore Configuration portlet. Click on view next to the private key you created, you should see the details of this key pair and the options to generate a certificate request and to import a certificate reply from a certification authority (CA).
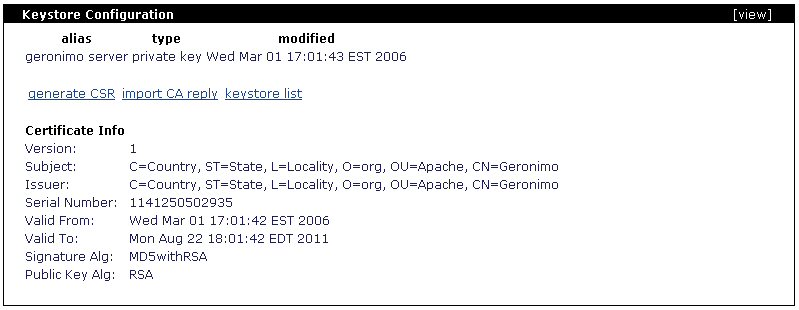
To generate a certificate request to send to a CA click on generate CSR, copy the content generated and send it to the CA (you would normally receive the instructions from the CA on how to send this CSR).
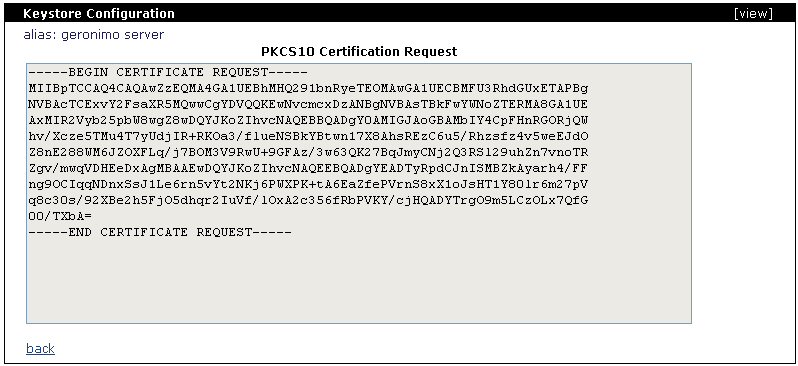
Once you receive the reply from the CA you will likely receive a certificate file, to add this certificate to the keystore follow the steps to import trusted certificate.
There is currently a known issue using the certificates to secure new HTTPS listeners, there is a patch alredady available and it should be applied to the next release of Apache Geronimo, see JIRA GERONIMO-1503 for details.
To use your own certificates instead of the one provided by default with the installation you need to create a new HTTPS listener. Use the Network Listener portlet available by selecting Web Server in the Console Navigation menu on the left hand side. The steps for adding a new HTTPS listener were covered earlier in the #Add new HTTPS listener section.
|
|
Privacy Policy - Copyright © 2003-2009, The Apache Software Foundation, Licensed under ASL 2.0. |