|
|
| Home > Documentation > Developing > Development environment > Installing Geronimo Eclipse Plugin |
This page describes how to install the current release of the GEP (GEP 2.2).
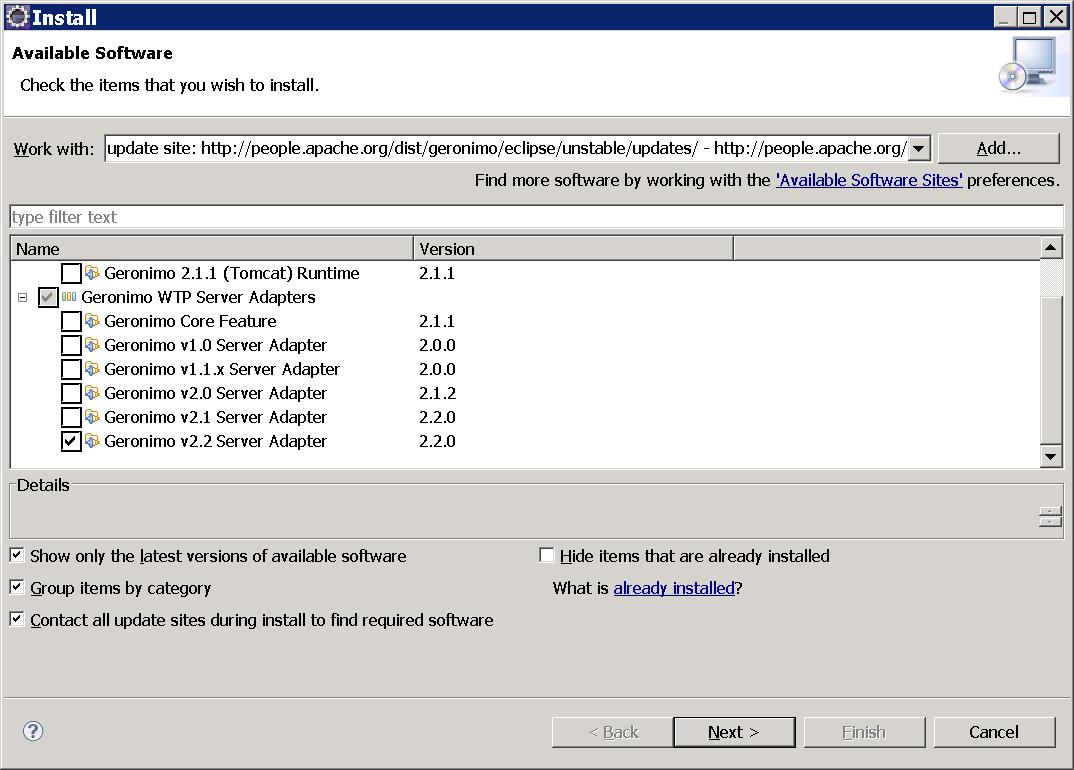
Note that with v2.2, the v2.2 Geronimo server adapter feature provides server adapters for the v1.1.x, v2.0.x, v2.1.x and v2.2 Geronino servers. The reason for supporting v1.1.x server is to make v1.1.x server adapter compatible with latest version of eclipse. But since Geronimo 1.1 did not officially support JDK 6, it's not recommended to use v1.1.x server adapter with JDK 6.See the requirement in GERONIMODEVTOOLS-578.
If you plan to upgrade GEP to the latest version, you have to uninstall the existing one from your Eclipse first. See Uninstalling GEP for more details.
Sun JDK 6.0 can be downloaded from Sun's J2SE 6.0 Downloads site. The Eclipse IDE for Java EE Developers can be downloaded from the Eclipse Downloads site. Download and extract the Eclipse IDE for Java EE Developers archives to a directory of your choice (for e.g. C:\eclipse). The archive will be extracted to a directory named eclipse under the directory you specified (for e.g. C:\eclipse\eclipse), referred to as <ECLIPSE_HOME> from now on. Make sure that the JDK in the PATH is Sun JDK 6.0. Launch Eclipse by running <ECLIPSE_HOME>/eclipse.
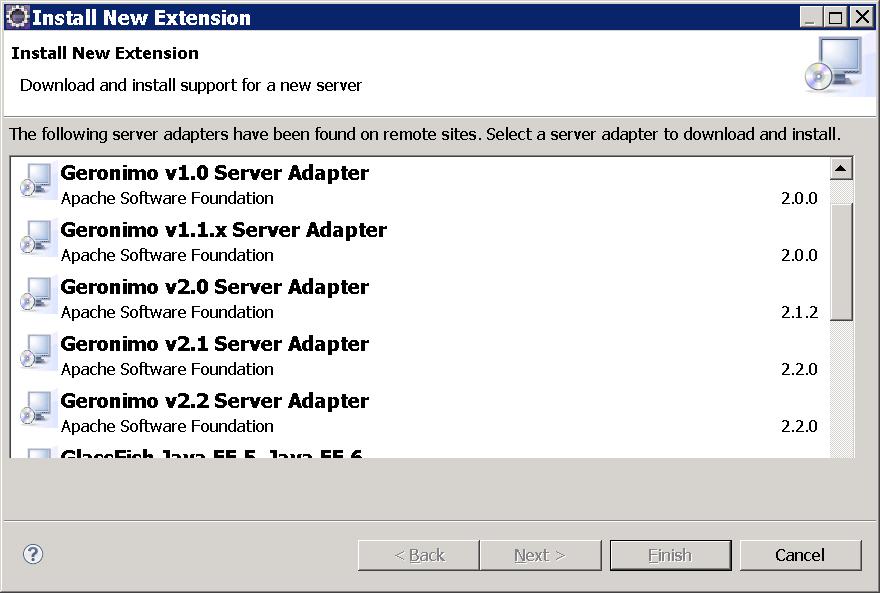
To install the Geronimo server, download the Geronimo 2.2 server from Apache Geronimo downloads and extract the archive to a directory of your choice (for e.g. C:\g). The archive will be extracted to a directory geronimo-tomcat6-javaee5-2.2 (for e.g. C:\g\geronimo-tomcat6-javaee5-2.2) or geronimo-jetty6-javaee5-2.2 depending on whether you downloaded Geronimo 2.2 distribution with Tomcat or Jetty as the web container. We will refer to this directory as <GERONIMO_HOME> from now on.
<ECLIPSE_HOME>/eclipse.By default Eclipse will be launched with Java EE perspective.

From version 3.4, Eclipse adopted a new update manager called P2. The update manager can't uninstall plug-ins that isn't installed by P2. As a result, with this method, GEP can't be uninstalled by eclipse update manager in eclipse 3.4. See Bug245469 for details.
![]() A video desktop demonstration of Installing the Apache Geronimo Eclipse Plugin with the Eclipse Update Manager is available.
A video desktop demonstration of Installing the Apache Geronimo Eclipse Plugin with the Eclipse Update Manager is available.
<ECLIPSE_HOME>/eclipse. By default Eclipse will be launched with Java EE perspective.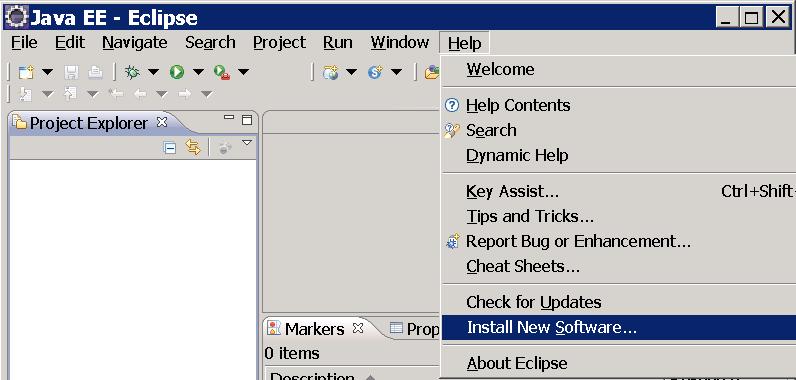


You can cleanly uninstalled GEP only if you have installed it cleanly. To do so, install your GEP by using Eclipse update manager. If your GEP was installed within WTP, reinstall it with Eclipse update manager to update some meta information so that a clean uninstallation can be preformed.
You can uninstall GEP by selecting either of the followings:
Uninstall does not work well on Ganymede, especially for GEP. It will uninstall GEP, but then you can't reinstall it, as it doesn't really get uninstalled. The only way to reinstall GEP in Ganymede is to reinstall Ganymede itself! See Eclipse Bugzilla 244935 for details, and hopefully a fix soon!
|
|
Privacy Policy - Copyright © 2003-2011, The Apache Software Foundation, Licensed under ASL 2.0. |