|
|
| Home > Documentation > Migrating to Apache Geronimo > Migrating from JBoss to Geronimo > JBoss to Geronimo - EJB-BMP Migration (Unverified on 2.2) |
An entity bean is defined as a representation of persistent data that has the ability to read from database and populate its fields with data. It can be updated and stored back to the database. There are two types of Entity Beans that come with Enterprise Java Beans: Bean-Managed Persistence(BMP) and Container-Managed Persistent(CMP). This article covers the migration of a BMP sample application. For this type of entity bean, actual code must be written to handle persistent operations such as loading, saving and finding data. The developer must use persistence API such as JDBC to select, insert, update, delete from a database.
This article is organized in the following sections:
BMP implementation may vary from one vendor to another. The purpose of this section is to provide a BMP specific feature-to-feature comparison between JBoss v4.0.5 and Apache Geronimo, so that you can clearly identify the differences and plan accordingly before migration.
Features | JBoss v4.2.1 | Apache Geronimo |
|---|---|---|
EJB Container | JBoss comes with its own implementation | Geronimo uses OpenEJB as its EJB Container |
This is a simple loan registration application which allows users to apply for loans and administrators to approve/reject the loans. Customers can apply for loans using the Web site while the manager uses a simple Java application to approval/reject loans. BMP Entity Bean has been used to manage Loan related persistence data from a database. In addition to that a Stateless Session Bean has been used handle work flow related activities.
The following figure illustrates the loan management Web application flow:
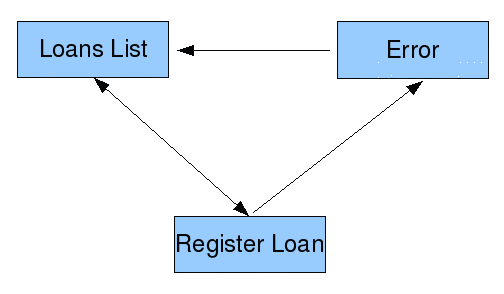
First page of the loan registration Web application acts as a notice board which displays list of loans and their current status. When a customer decides to apply for a Loan, he/she can use loan registration form. After the registration of the loan, it is categorized under pending status. A manager who has the administrator privileges will use a small application to change the status of loans. Using this application, the manager can change the status of pending loans to either approved or rejected.
This loan management web application also includes the following JSP pages:
The tools used for developing and building the Loan Manager application are:
The Eclipse IDE was used for development of the sample application. This is a very powerful and popular open source development tool. Integration plug-ins are available for both JBoss and Geronimo. Eclipse can be downloaded from the following URL:
http://www.eclipse.org
Ant is a pure Java build tool. It is used for building the war files and populating the database for the Online Brokerage application. Ant can be downloaded from the following URL:
http://ant.apache.org
This section shows you how and where the sample JBoss reference environment was installed so you can map this scenario to your own implementation. Note that for this migration example JBoss v4.2.1 was used.
Detailed instructions for installing, configuring, and managing JBoss are provided in the product documentation. Check the product Web site for the most updated documents.
The following list highlights the general tasks you will need to complete to install and configure the initial environment as the starting point for deploying the sample application.
In order to build and run the Loan Management application included in this article, you will need to install and configure the build tool and the database that is used by the application.
This application is using the HSQL database that comes as part of the JBoss bundle. You need to modify the script for creating the database. Edit the localDB.script file located in the <jboss_home>\server\<your_server_name>\data\hypersonic directory:
Add the top of the localDB.script file the content of the following example in order to create the sample HSQL database. Also add the sample data to the same file at the end given in the config/db.sql under the JBoss Specific Data.
Make sure JBoss is not running at the time of modifying this file.
As mentioned before, Apache Ant is used to build the binaries for the Online Brokerage application. If you do not have Ant installed this is a good time for doing it and make sure that <ant_home>/bin directory is added to the system's path variable.
Apache Ant can be downloaded from the following URL:
XDoclet is going to be used as build tool for the configuration file generation. It is an open source code generation engine. It enables Attribute-Oriented Programming for Java. In short, this means that you can add more significance to your code by adding meta data (attributes) to your Java sources. This is done in special JavaDoc tags.
Although XDoclet originated as a tool for creating EJBs, it has evolved into a general-purpose code generation engine. XDoclet consists of a core and a constantly growing number of modules. It is fairly straight forward to write new modules if there is a need for a new kind of component.
http://xdoclet.sourceforge.net/xdoclet/index.html
Just extract the latest version of the XDoclet and set the xdoclet.home parameter in to the build.properties file.
The loan manager application included with this article provides an Ant script that you will use in order to build the application. Download the loan manager application from the following link:
After extracting the zip file, a loan directory is created. In that directory open the build.properties file and edit the properties to match your environment as shown in the following example:
Before starting the build process just set the correct paths for the geronimo.home and xdoclet.home entries in the build.properties file in the config directory.
From a command prompt or shell go to the loan directory and run ant jboss. This will build the ear file and place it directly in the releases/jboss directory.
To deploy the sample application just copy the Loan.ear will be created under the loan/releases/jboss folder to the <jboss_home>/server/<your_server_name>/deploy folder.
If JBoss is already started, it will automatically deploy and start the application; otherwise, the application will be deployed and started at the next startup.
To test the application, open a Web browser and access the following URL:
This brings up the loan manager main page with the list of loans and their current statuses.Register link will forward you to the loan registration form which accepts number of fields before adding loans in to the loan information database.

To change the status of a loan, manager has to find the loan ID from the Web application and has to provide it in the client application as given below.
java -jar LoanStatusChanger.jar <loanId> <status>
Status filed will change according to the following values. The following are the status values of relevant loans.
Make sure you add the <jboss-home>/client/jbossall-client.jar file to your class path before running the above command.
Download and install Geronimo from the following URL:
http://geronimo.apache.org/downloads.html
The release notes available there provide clear instructions on system requirements and how to install and start Geronimo. Throughout the rest of this article we will refer to the Geronimo installation directory as <geronimo_home>.
If you are planning to run JBoss and Geronimo on the same machine consider to change the default service ports on, at least, one of these servers.
When you built the loan manager sample application, Ant packaged the deployment descriptors for both JBoss jboss.xml and Geronimo openejb-jar.xml as they were already provided by the sample application. These files are located in the loan/config directory.
The following example shows the JBoss deployment descriptor.
Compare it with the contents of the Geronimo deployment plan shown in the following example.
First difference can be clearly noted is Geronimo specific configuration has additional information than JBoss specific one. That part of the Geronimo configuration file is quite similar to a Maven 2 build script. Both of these given configuration files have EJB information. JBoss uses local JNDI names to link the EJBs while Geronimo directly use the EJB's name. In addition to above differences the openejb-jar.xml file clearly gives the EJB reference information than the jboss.xml file.
The Web archive related configuration files give you few more differences.
jboss-web.xml maps the EJBs using JNDI names as given above while geronimo-web.xml directly uses the EJB's name. The reference names given in each mapping will be used refer EJBs from the Servlets. web.xml file of the WAR file contains more information about each EJB reference name, which will be common to the both Geronimo and JBoss flavors of this application.
Build the migrated Geronimo version of the sample application by running following command from the loan directory.
ant geronimo
It will create Loan.ear file in the loan/releases/geronimo folder.
To deploy the migrated Loan Manager application, make sure the Geronimo server is up and running and user has to populate the database and then deploy the sample application.
This sample application will use the default Geronimo System database to hold the application specific data.
In the Geronimo console follow given steps.
Open Geronimo console in your browser and follow the given steps:
To test the application, open a Web browser and access the following URL:
To change the status of a loan, the user has to find the loan ID from the Web application and has to provide it in the client application as given below.
java -jar LoanStatusChanger.jar <loanId> <status>
Make sure you add the following list of JAR files to your class path before running the above command.
This article has shown how to migrate a sample application that uses BMP entity beans, from JBoss v4.2.1 to Apache Geronimo. This article provided step-by-step instructions to build the application, deploy and run it, and then migrate it to the Geronimo environment.
The following list summarizes the major differences found during this sample application migration.
|
|
Privacy Policy - Copyright © 2003-2011, The Apache Software Foundation, Licensed under ASL 2.0. |