|
|
| Home > Documentation > Migrating to Apache Geronimo > Migrating from JBoss to Geronimo > JBoss to Geronimo - JDBC Migration |
This article will help you migrate JDBC applications developed for JBoss v4 to Apache Geronimo. This article is part of a series of migration articles covering different types of applications migration.
This article provides details on the JDBC implementation differences between these two application servers as well as a detailed step-by-step migration procedure for porting JDBC applications from JBoss v4 to Apache Geronimo. To define a common starting point (the source environment), this article provides steps of deploying the Online Brokerage sample application into the JBoss source environment. Then you will be guided through the application migration and deployment process in Apache Geronimo.
This article is organized in the following sections:
JDBC implementation might vary from one vendor to another. The purpose of this section is to provide a JDBC specific feature-to-feature comparison between JBoss and Apache Geronimo so you can clearly identify the differences and plan accordingly before migration.
Given that JBoss and Geronimo both use J2CA connectors for accessing JDBC resources, there will be an overlap of some J2CA features when comparing the platform specific JDBC features.
Note: Since Geronimo is still in its infancy, some of the features provided by JBoss might not yet be implemented in Geronimo.
Feature | Apache Geronimo | JBoss v4 |
|---|---|---|
JDBC access | Geronimo does not have any direct integration with JDBC but supports access through the generic J2CA framework. The TranQL project has J2CA adapters for various databases. | JDBC access in JBoss is through JDBC connectors based on the JCA specification. |
JCA implementation | Geronimo supports the JCA 1.5 specification and is backward compatible to the JCA 1.0 specification. | JBoss AS 4.0 implements the JCA (Java Connector Architecture) 1.5 specification instead of the JCA 1.0 in JBoss AS 3.2. |
Data sources supported | TranQL has generic wrappers for data source, ConnectionPoolDatasource, and XADataSource. | Supports 5 types of data sources:
|
Data source failover | TranQL has specialized drivers for certain databases (including Apache Derby, Oracle, MySQL, DB2 and SQL Server) that provide a tighter integration with the advanced features of the driver. | JBoss has data source failover capabilities implemented through two data sources. |
XA support | Supports XA transactions, Local Transactions, and No transaction. | Supports XA transactions, Local Transactions, and No transaction. |
Connection Manager Configurability | The J2CA framework is interceptor based which allows different parts of the connection framework to be plugged in. | You can plug in your own custom connection manager if required. |
JTA implementation | Transaction support is provided through JOTM and HOWL. | Full support for JTA through JBossJTA. |
Connection pooling and management | Custom Geronimo Code and TranQL used for connection pooling and management. | JBossCX framework used for connection pooling and management. |
Legacy driver support | Geronimo also provides this through the TranQL- connector JDBC to JCA wrapper in Geronimo. Supports JDBC 3.0 and 2.1. | JBoss provides connection to RDBMS that have not yet implemented JCA- JDBC drivers through JCA wrappers for JDBC drivers. |
This article contains a sample application to demonstrate migrating an application from JBoss to Geronimo, called Online Brokerage. It represents an online trading scenario in which users can buy and sell stocks. The application has the following five pages:
The following figure illustrates the application flow:
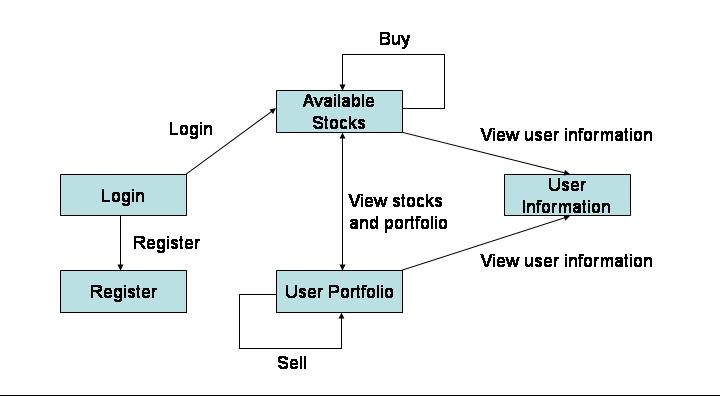
First, you accesses the Login page. From the Login page you enter the user name and password. If the user name or password is not valid the application throws an error message and rejects your login attempt. If the user name and password are correct, you are taken to the Available Stocks page where you can view all the stocks that are present for sale at that time.
You can choose to buy as many stocks as wanted, depending on the available money in the account, by clicking the Buy button.
After the transaction completes successfully you are brought back to the Available Stocks page where you can buy more stocks if required.
If you have insufficient funds to buy stocks the application will throw an error and will not process the transaction. The error message is shown at the top of the Available Stocks page. There is a User Info button on this page. On clicking this button you are taken to the User Info page and shown the user details.
From the Available Stocks page there is a View your Portfolio link that shows all the stocks that you own. In that page, you can select the stocks and quantity to sell. This page also shows your available cash in the User Cash field. If you try to sell more stocks than you have, the application will throw an error. The error message will be shown on the same page. For each successful sale the sale amount is added to the user's cash balance.
The quantity text box shows the quantity of stocks of a particular company that you have. The Quantity to Sell field allows you to enter the quantity of stocks to sell for a specific company. For selling and buying the radio button should be checked. This be done after entering the values. If either the quantity to sell textbox is not filled or the selection box is not checked and you press on sell a JavaScript alert will be triggered saying that the required field is empty. On entering non-numeric characters for quantity another alert will be triggered. This behavior is similar for the Available Stocks page as well.
If you are a new user, you can register by clicking the Register button in the login page. In the Registration page you will enter a user id, user name, password, address and available cash.
The Online Brokerage sample application consists of the following packages:
The Online Brokerage also includes the following JSP pages:
The tools used for developing and building the Online Brokerage application are:
The Eclipse IDE was used for development of the sample application. This is a very powerful and popular open source development tool. Integration plug-ins are available for both JBoss and Geronimo. Eclipse can be downloaded from the following URL:
http://www.eclipse.org
Ant is a pure Java build tool. It is used for building the war files and populating the database for the Online Brokerage application. Ant can be downloaded from the following URL:
http://ant.apache.org
The database used for demostrating this application is MySQL. The name of the sample database is tradedb and it consists of the following three tables, STOCKS, USERS and TRADINGACCOUNT. The fields for each of these tables are described below.
Table Name | Fields |
|---|---|
STOCKS | ID (PRIMARY KEY) |
USERS | USERID (PRIMARY KEY) |
TRADINGACCOUNT | USERID |
The TRADINGACCOUNT table is used to store the stocks that are owned by each user. The USERS and STOCKS tables are used to store the user and stock details. Because this is just a sample application the amount of money that a user has is entered during user registration by the user itself.
The DDL file used for populating this database is db.sql and it is located in the brokerage/sql directory.
This section shows you how and where the sample JBoss reference environment was installed so you can map this scenario to your own implementation.
Detailed instructions for installing, configuring, and managing JBoss are provided in the product documentation. Check the product Web site for the most updated documents.
The following list highlights the general tasks you will require to complete to install and configure the initial environment as the starting point for deploying the sample application.
<jboss_home><jboss_home>\server\default to <jboss_home>\server\<your_server_name>run.sh -c <your_server_name> command from the <jboss_home>\bin directory.In order to build and run the Online Brokerage application included in this article, you must install and configure the build tool and the database that is used by the application.
As mentioned earlier in the article, this application is using the MySQL database that can be downloaded from the following URL:
http://www.mysql.com
The Installation and configuration of MySQL is fairly intuitive and it is well documented in the MySQL Reference Manual available at the following URL:
http://dev.mysql.com/doc/mysql/en
Note: During the instance configuration modified the security settings and specified password as the password for the root user. This user ID and password will later be used for accessing the database from the sample application.
Once the MySQL instance is configured you need to create the sample database that will be used by the Online Brokerage application. From a command line, type the following command to start the MySQL monitor:
mysql -u root -ppassword
Note that there is no blank between the flag -p and the password.
This will bring up the MySQL command interface as shown in the following example:
From the MySQL command interface create the tradedb sample database by typing the following command:
mysql> create database tradedb;
As mentioned before, Apache Ant is used to build the binaries for the Online Brokerage application. If you do not have Ant installed this is a good time for doing it and make sure that <ant_home>\bin directory is added to the system's path variable.
Apache Ant can be downloaded from the following URL:
In order to successfully build and deploy the Online Brokerage application and database, you will first configure some resources. This section describes how to configure a MySQL data source in JBoss.
The Online Brokerage application is a Web application that uses a data source to connect to the MySQL database. To use JBoss with MySQL, you must copy the MySQL driver into the JBoss server classpath. The driver, which is provided by the database vendor, is called Connector/J 3.0 and can be downloaded from the following URL:
http://dev.mysql.com/downloads/connector/j/3.1.html
After downloading and extracting the driver, copy the mysql-connector-java-3.1.14.jar file to the <jboss_home>\server\<your_server_name>\lib directory.
The data source configuration in JBoss is done through an XML configuration file. The JBoss installation contains sample configuration files for many popular databases including MySQL.
The sample data source configuration file for MySQL is mysql-ds.xml and it is located in the <jboss_home>\docs\examples\jca directory:
Copy the mysql-ds.xml file to the deploy directory of your JBoss server (<jboss_home>\server\<your_server_name>\deploy) and edit it as shown in the following example:
Delete all the other tags inside the <local-tx-datasource> tag and save the file. JBoss will automatically deploy the data source.
The Online Brokerage application included with this article provides an Ant script that you will use in order to build the application and populate the database. Download the Online Brokerage application from the following link:
After extracting the zip file, a brokerage directory is created. In that directory open the build.properties file and edit the properties to match your environment as shown in the following example:
When specifying the driver.classpath in the build.properties file, make sure to use just the forward slash "/" , otherwise the build will not find the jar file.
From a command prompt or shell go to the brokerage directory and run ant. This will build the war file and place it directly in the brokerage directory. The war created by the ant build contains a JBoss specific deployment descriptor, the jboss-web.xml file in the WEB-INF directory of the WAR is shown in the following example.
The resource-ref element is used to map the resource referred to by the name jdbc/TradeDB in the web.xml file to the resource with the JNDI name java:jdbc/TradeDB i.e. the MySQL datasource.
To deploy the Online Brokerage application in JBoss, copy the brokerage.war file you just built with Ant to the following directory:
<jboss_home>\server\<your_server_name>\deploy
If JBoss is already started, it will automatically deploy and start the application; otherwise, the application will be deployed and started at the next startup.
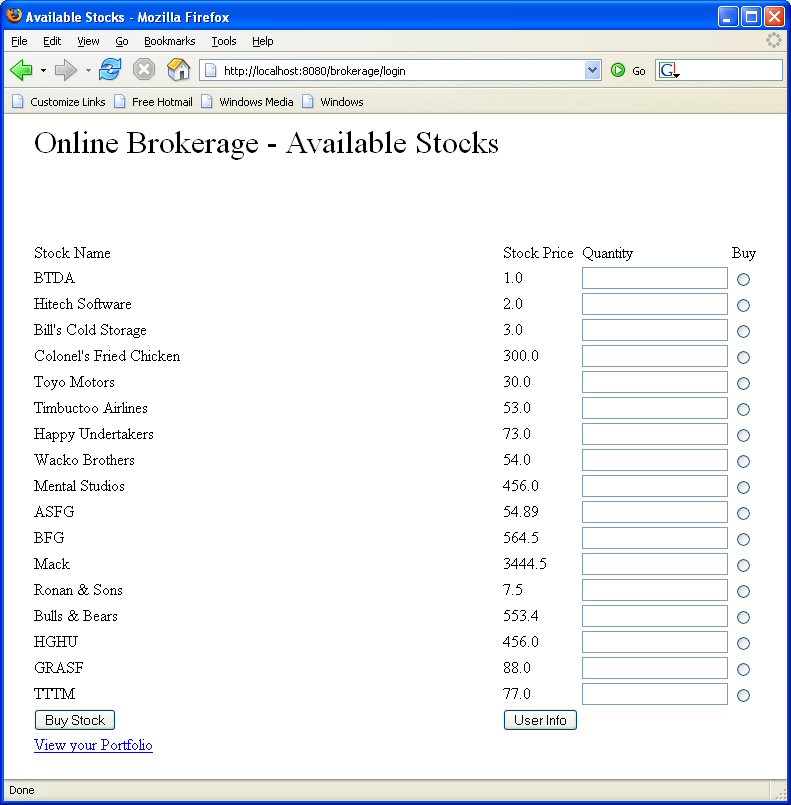
To test the application, open a Web browser and access the following URL:
http://localhost:8080/brokerage
This brings up the login screen of the Online Brokerage application. Enter j2ee as the user name and password as the password and click login. This takes you to the available stocks page illustrated in the following figure. The application is now configured and running.
If you want to use another root password for the database, replace the occurrences of password with the required password. This has to be changed in the following three places:
Download and install Geronimo from the following URL:
http://geronimo.apache.org/downloads.html
The release notes available there provide clear instructions on system requirements and how to install and start Geronimo. Throughout the rest of this article we will refer to the Geronimo installation directory as <geronimo_home>.
If you are planning to run JBoss and Geronimo on the same machine consider to change the default service ports on, at least, one of these servers.
In Geronimo the JDBC resources are implemented using J2EE connectors. Therefore, you need to write a Geronimo specific deployment plan for deploying a JDBC datasource. Additionally, while doing the deployment you need to provide the deployer with the tranql-connector-ra-1.3.rar file. This RAR file contains the connection pool management logic for Geronimo.
For running the Online Brokerage application in Geronimo, you will be using the same MySQL database that was used with JBoss. So the only task you do in order to prepare the Geronimo environment is to configure the data source.
The first thing you do is to copy the MySQL database driver into the Geronimo repository so that you can refer to it in the data source deployment plan.
The Geronimo repository is located at <geronimo_home>/repository. Inside this directory, create a directory called mysql/mysql-connector-java/3.1.14-bin and copy the mysql-connector-java-3.1.14-bin.jar file into it. Now, you create the data source deployment plan.
There are three types of data sources that Geronimo supports:
For this migration exercise you will be using a Global data source. For instructions on configuring and using the other two types of data sources see the the following developerWorks article:
http://www.ibm.com/developerworks/opensource/library/os-ag-jdbc/
First, create an xml file called mysql-geronimo-plan.xml. Copy the plan shown in the following example and paste it in the xml file.
The listing above shows the plan for deploying a J2EE connector which will provide JDBC access to the database. The root element is the <connector> element. This element has the following four attributes:
Other important elements and attributes are:
The following table shows the configuration properties that are specified by the config-property-setting element.
Configuration Property | Meaning |
|---|---|
Driver | Fully qualified class name of the JDBC driver. |
ConnectionURL | The JDBC connection URL. This can contain parameters when supported by the driver. For example, for MySQL to use named pipes instead of TCP/IP you can attach |
UserName | The user name needed to connect to the database. |
Password | The password needed to connect to the database. |
CommitBeforeAutocommit | In case the JDBC driver does not commit the pending data changes when |
ExceptionSorterClass | To provide information to the pool whether the Exceptions that occur are fatal or not. |
After creating the MySQL deployment plan we need to deploy the connection pool datasource by running the deployer tool.
Start the Geronimo Instance as the deployer tool requires the server to be up and running.
From a command line change directory to <geronimo_home>/bin and run the following command:
deploy --user system --password manager deploy <brokerage_home>\plan\mysql-geronimo-plan.xml <geronimo_home>\repository\org\tranql\tranql-connector-ra\1.3\tranql-connector-ra-1.3.rar
where brokerage_home is the path of the brokerage directory.This will deploy the data source.
Now you are ready to proceed with the migration.
Geronimo does not support accessing external resources(JDBC datasources) by setting JNDI properties at runtime as shown in the following example:
This is because reference resolution is done at deploy time and is based on the JSR-77 object names of the target component. In order to migrate the Online Brokerage application to Geronimo, you first replace the jboss-web.xml file with a geronimo-web.xml file which is the Geronimo-specific descriptor file.
The geronimo-web.xml file is located in the <brokerage_home>\web\descriptors\geronimo directory and looks like the following example.
As shown in the example, the parent for this configuration is the MySQL J2EE connector. The naming:resource-ref element maps the TradeDS data source to the name jdbc/TradeDB. The context-root element gives the context-root of the application.
These are the only changes required to run this application on Geronimo.
In order to build the .war file for Geronimo, you can modify the build.properties file that is provided with the sample application to remove the jboss-web.xml and include the geronimo-web.xml. This is done by changing the server.name property to geronimo. Also you must specify the property geronimo.home in the build script.
The two values that you need to modify are:
server.name=geronimo
geronimo.home=<geronimo_home>
The build.properties is used by the build script to pick up the J2EE specs for Geronimo. If your jboss.home property is still valid, it is not required to set this property. If this property is not set and the jboss.home is also not valid then you will get compilation errors. You must set the driver.classpath to point to the new driver jar. Now from the command prompt go to the brokerage directory and run ant. This builds the war file and places it directly in the brokerage directory.
To deploy the migrated Online Brokerage application, make sure the Geronimo server is up and running.
From a command line, change directory to <geronimo_home>\bin and type the following command:
deploy --user system --password manager deploy <brokerage_home>/brokerage.war
Once the application is deployed, open a Web browser and access the following URL:
http://localhost:8080/brokerage
Login with the same user name and password you used when testing the application from JBoss.
This article has shown you how to migrate a sample application, from JBoss to the Apache Geronimo application server. You followed step-by-step instructions to build the application, deploy and run it, and then migrate it to the Geronimo environment.
The following list summarizes the major differences found during this sample application migration.
|
|
Privacy Policy - Copyright © 2003-2011, The Apache Software Foundation, Licensed under ASL 2.0. |