|
|
| Home > Documentation > Apache Geronimo v1.1 - User's Guide > Quick start - Apache Geronimo for the impatient |
If you are in a hurry to have Apache Geronimo up and running right away, this article will provide you with some basic steps for downloading, building (when needed) and run the server in no time. This is clearly not a complete guide so you may want to check the other links in the Apache Geronimo v1.1 - User's Guide main section for further information.
All you need is 5 to 10 minutes and to follow these basic steps.
Apache Geronimo is a J2EE certified application server that is completely opensource and under the Apache License. Geronimo first passed the Technology Compatibility Kit(TCK) test in 2005 and v1.0 was released in January 2006. The Geronimo community is backed by over 28 committers from more than 8 companies, multiple organizations have already started builing applications on Geronimo. Geronimo v1.1 is the second official release of the application server by the Apache Software Foundation.
At this time you have one option to get the software. The fastest and easiest way is to get the binary directly from the Apache site. Since this article is intended to help you to have Apache Geronimo up and running in the fastest way only the binary download will be covered at this time.
Although this installation path is the fastest one, still you will need to install some software before installing Geronimo.
Geronimo is currently using the Sun ORB for RMI so it is required to use SUN JDK. Refer to the following URL for details on how to download and install J2SE 1.5:
http://java.sun.com
Depending on the platform you plan to install and run Apache Geronimo you will select the appropriate installation image. Open a Web browser and access the following URL, there you will find the available packages for download (binaries and source code).
http://geronimo.apache.org/downloads.html
Apache Geronimo v1.1 is certified on J2EE 1.4 but it works with 1.5 as long as CORBA or daytrader are not used.
Select the file compression format compatible with your system (zip, tar, gz) by clicking directly on the link, download it and expand the binary to your hard drive in a new directory. For example in z:/geronimo, from now on this directory will be referenced as <geronimo_home>.
The installation of Apache Geronimo is as simple as uncompressing the .zip or .tar files. The next step is to start the server.
With Apache Geronimo already installed, open a command line console and change directory to <geronimo_home>/bin. In that directory you will find some script files (.bat and .sh) and five .jar files. If you look at these five files you will find:
These jar files can be started using the java -jar to invoke the main class in <geronimo_home>/bin/<the name of the .jar file>.
The client.jar file can be used to start the Geronimo configuration that contains the application client that you want to run.
The deployer.jar file is a Java application that manages J2EE artifacts and GBeans that run on the Geronimo server.
The server.jar file is used to start the Geronimo server.
The update.jar can be used to upgrade xml files from the previous Geronimo version to the current one.
The shutdown.jar file can be invoked from command line to shutdown the server.
Alternatively, the above mentioned files can also be started using their respective scripts.
To start the server run the following command:
java -jar server.jar
Alternatively a script is provided, the startup script will also start the server. Once the server is started you should see the following information on the command line console.
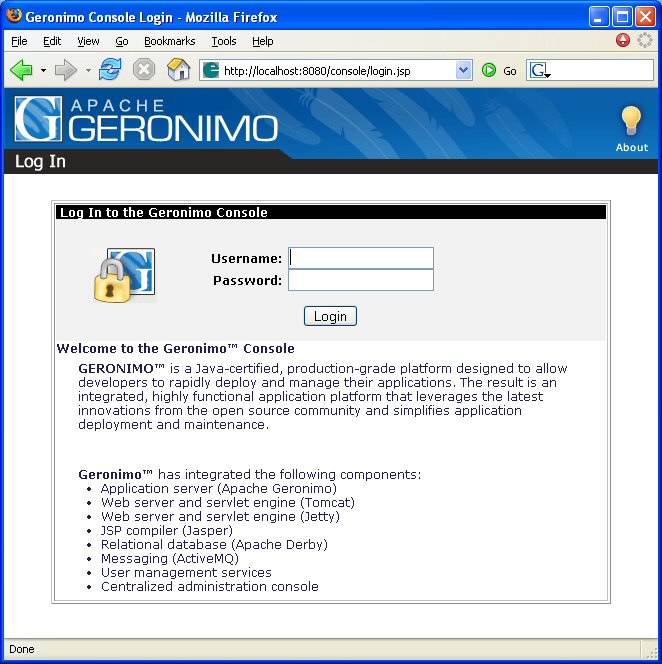
To test the Apache Geronimo server you can just point your Web browser to the following URL to test the Geronimo Console. The Geronimo Console is the first application you can test, and the good thing is, it is already deployed.
When prompted enter system as the user name and manager as the password.
The following figure illustrates the Web based console.
At this point you have Apache Geronimo up and running and the time spent has been minimal. The following section will propose a very basic sample JSP and show you how to deploy and run that sample application.
A HelloWorld like JSP is almost a default for these basic testing and everybody is already familiar with it. Create a new directory to hold all the application related files. From now on this directory will be referred as <app_home>.
Create a plain text file in the <app_home> directory named HelloWorld.jsp and copy the content of the following example.
Although for such a simple application it is not necessary, you will still create a Geronimo deployment plan so you would get a first view of the deployment plans. Create a directory named WEB-INF inside the <app_home> directory.
Create a plain text file in the <app_home>/WEB-INF directory named geronimo-web.xml and copy the content of the following example.
This version of geronimo-web.xml will not work in Geronimo v1.0
Create a plain text file in the <app_home>/WEB-INF directory named web.xml and copy the content of the following example.
From a command line window change directory to <app_home> and run the following command to package the HelloWorld application into a single .war file.
jar -cvf HelloWorld.war *
This will create a HelloWorld.war file in the <app_home> directory. The next step is to deploy this application.
To deploy the application you have two options, you can use the Geronimo Console or the command line. For this example you will use both.
Through the console
Log into the Geronimo console and click on the Deploy New link of the Applications folder located on the left hand side of the console navigation panel. This will load the Install New Applications window.
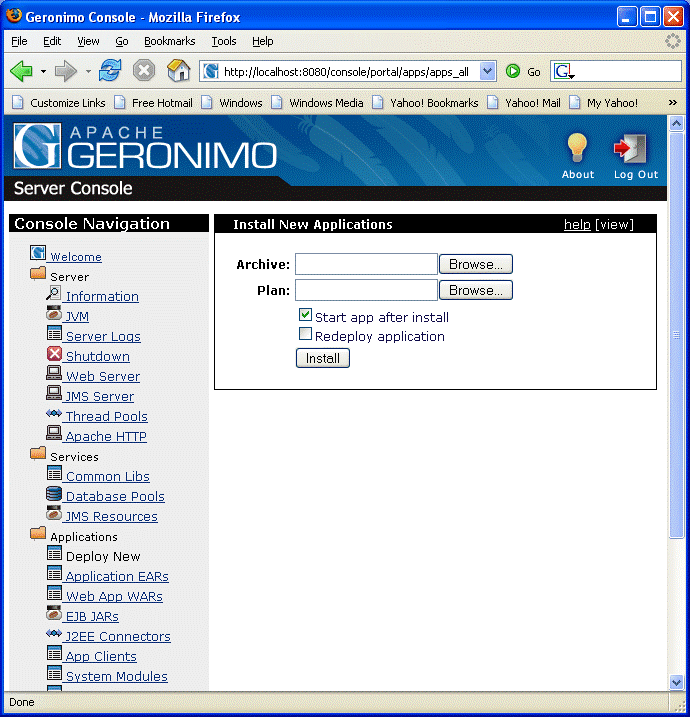
Then select and load the HelloWorld.war file into the Archive input box and click install button to deploy application in to the server. Once the application is successfully deployed, the screen will be updated with a successful deploy message. Before clicking the install button, make sure that the "Start app after install" checkbox is enabled.
Through command line
Change directory to <geronimo_home>/bin and run the following command:
java -jar deployer.jar --user system --password manager deploy <app_home>/HelloWorld.war
Once the application is successfully deployed you should see the following message:
Test the application by pointing a Web browser to the following URL:
This article showed you how simple is to have Apache Geronimo up and running. The overall time for getting the server running should be less than five minutes if you have the prerequisite (Java 1.5) already installed. Additionally, this article also showed you how to create, deploy and test a very simple JSP in less than five minutes.
|
|
Privacy Policy - Copyright © 2003-2009, The Apache Software Foundation, Licensed under ASL 2.0. |