|
|
| Home > Documentation > Apache Geronimo v1.0 - User's Guide > Migrating to Apache Geronimo > JBoss to Geronimo - EJB-BMP Migration |
An entity bean is defined as a representation of persistent data that has the ability to read from database and populate its fields with data. It can be updated and stored back to the database. There are two types: Bean-Managed Persistence(BMP) and Container-Managed Persistent(CMP). This article covers the migration of a BMP sample application. For this type of entity bean, actual code must be written to handle persistent operations such as loading, saving and finding data. The developer must use persistence API such as JDBC to select, insert, update, delete from a database.
This article is organized in the following sections:
BMP implementation may vary from one vendor to another. The purpose of this section is to provide a BMP specific feature-to-feature comparison between JBoss v4 and Apache Geronimo so you can clearly identify the differences and plan accordingly before migration.
Features | JBoss v4 | Apache Geronimo |
|---|---|---|
EJB Container | JBoss comes with its own EJB Container implementation. | Geronimo uses OpenEJB as its EJB Container. |
JMS implementation | JBoss is packaged with JBoss MQ. | Geronimo uses ActiveMQ as its JMS implementation. |
The Loan BMP application is very simple. When the command line client is run, an entry is made into the database. The findByPrimaryKey() method of the CustomerHomeRemote interface is called and the field values of the returned CustomerRemote object are printed to the console. This is followed by a call to the findBySssNo() method after which the field values of the returned CustomerRemote object are printed to the console.
The following figure illustrates the application flow:
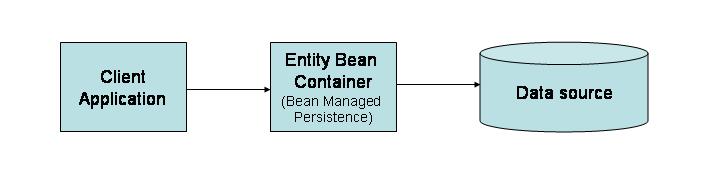
The user runs the command line client which then either creates an entity bean (which then adds itself to the datasource) or asks for one, by primary key, which is created from information that is stored in the database.
The Loan BMP application consists of the following packages:
In addition to these classes, the Loan BMP sample application provides a Web Application client with two JSPs (create.jsp and list.jsp).
The tools used for developing and building the Loan BMP sampple application are:
The Eclipse IDE was used for development of the sample application. This is a very powerful and popular open source development tool. Integration plug-ins are available for both JBoss and Geronimo. Eclipse can be downloaded from the following URL:
Maven is a software project management and comprehension tool. Based on the concept of a project object model (POM). Maven can manage a project's build, reporting and documentation from a central piece of information.
For this migration example Maven 1.0.2 was used. Maven can be downloaded from the followinf URL:
The sample database for the Loan BMP application has only one table. This is an in-memory table. The MEMORY storage engine creates tables with contents that are stored in just in memory. These were formerly known as HEAP tables.
The following table describes the fields of the CUSTOMER table.
Field | data type |
|---|---|
id | INTEGER |
name | VARCHAR(45) |
birthdate | DATE |
sss_no | VARCHAR(25) |
address | VARCHAR(60) |
annual_salary | DOUBLE |
loan_amount | DOUBLE |
This section shows you how and where the sample JBoss reference environment was installed so you can map this scenario to your own implementation. Note that for this migration example JBoss v4.0.2 was used.
Detailed instructions for installing, configuring, and managing JBoss are provided in the product documentation. Check the product Web site for the most updated documents.
The following list highlights the general tasks you will need to complete to install and configure the initial environment as the starting point for deploying the sample application.
run.sh -c <your_server_name> command from the <jboss_home>\bin directory.In order to build and run the Loan BMP application included in this article, you need to install and configure the build tool and the database that is used by the application.
This application is using the HSQL database that comes as part of the JBoss bundle. You need to modify the script for creating the database. Edit the localDB.script file located in the following directory:
<jboss_home>\server\<your_server_name>\data\hypersonic
Add at the top of the localDB.script file the content of the following example in order to create the sample HSQL database.
Make sure JBoss is not running at the time of modifying this file.
CREATE MEMORY TABLE CUSTOMER(ID INTEGER NOT NULL PRIMARY KEY,NAME VARCHAR(45),BIRTHDATE DATE,SSS_NO VARCHAR(25),ADDRESS VARCHAR(60),ANNUAL_SALARY DOUBLE,LOAN_AMOUNT DOUBLE)
As mentioned before, Apache Maven is used to build the binaries for the Loan BMP application. If you do not have Maven installed this is a good time for doing it.
Apache Maven can be downloaded from the following URL:
In order to build the loan application a Maven script has been provided. Download the Loan application from the following link:
After extracting the zip file, a loan-bmp directory will be created. From now on, this directory will be referred as <bmp_home>. In that directory open the project.properties file. Edit the maven.jboss.home property to match your environment.
maven.jboss.home=<jboss_home>
From a command prompt or shell go to the <bmp_home> directory and run the following command:
maven
This will build the jar and war files and put them in the <bmp_home>/target directory. The jar created by the Maven build contains a JBoss specific deployment descriptor, the jboss.xml file in located the META-INF directory of the JAR is shown in the following example:
The jndi-name element is used to bind the CustomerEJB to the name CustomerHomeRemote in JNDI.
To deploy the Loan BMP application in JBoss, copy the entity-ejb-SNAPSHOT.jar and entity-ejb.war files you just built with Maven to the following directory:
<jboss_home>\server\<your_server_name>\deploy
If JBoss is already started, it will automatically deploy and start the application; otherwise, the application will be deployed and started at the next startup.
To test the sample client application type the following command from the <bmp_home> directory:
maven run:client
When you run this command, you will receive a list of all the loans that were retireved from the database, you should see a screen similar to the one shown in the following example:
E:\loan-bmp>maven run:client
 __  __
|  \/  |__ _Apache__ ___
| |\/| / _` \ V / -_) ' \  ~ intelligent projects ~
|_|  |_\__,_|\_/\___|_||_|  v. 1.0.2

build:start:

run:client:
    [java] creating customer...
    [java] done.findByPrimaryKeyTest... 1
    [java] customer name: Customer 1
    [java] customer sss no: 2323232
    [java] customer loan amount: 0.0
    [java] customer annual salary: 0.0
    [java] customer birthdate: Fri Oct 21 15:40:39 EDT 2005
    [java] updating ejb...
    [java] done.findBySssNoTest... 2323232
    [java] customer name: Customer 2
    [java] customer sss no: 2323232
    [java] customer loan amount: 0.0
    [java] customer annual salary: 0.0
    [java] customer birthdate: Fri Oct 21 15:40:39 EDT 2005
BUILD SUCCESSFUL
Total time: 3 seconds
Finished at: Fri Oct 21 15:40:39 EDT 2005

E:\loan-bmp>
To test the sample Web application point your browser to:
http://localhost:8080/entity-ejb
You should see the following screen:
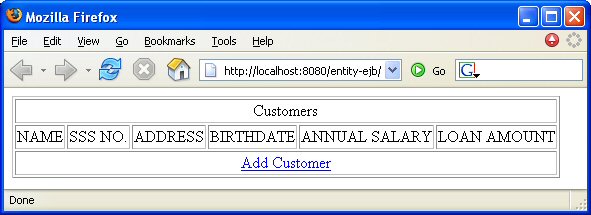
Click on Add Customer. Enter the new customer information then click Create, this will take you to the first page showing the updated list of customers.
Download and install Geronimo from the following URL:
http://geronimo.apache.org/downloads.html
The release notes available there provide clear instructions on system requirements and how to install and start Geronimo. Throughout the rest of this article we will refer to the Geronimo installation directory as <geronimo_home>.
TCP/IP ports conflict
If you are planning to run JBoss and Geronimo on the same machine consider to change the default service ports on, at least, one of these servers.
For this scenario the Loan BMP will use directly the SystemDatabase from Geronimo. In this case there is no need to set up a new connector for the SystemDatabase since it is already configured as the DefaultDatasource.
Ensure that Geronimo is up and running. If the server has not been started yet, do so by typing the following command:
<geronimo_home>/bin/startup.sh
Once the server is started you should see a screen similar as the one illustrated in the following example:
E:\geronimo\bin>startup
Booting Geronimo Kernel (in Java 1.4.2_09)...
Starting Geronimo Application Server
[*************] 100%  32s Startup complete
  Listening on Ports:
    1099 0.0.0.0 RMI Naming
    1527 0.0.0.0 Derby Connector
    4201 0.0.0.0 ActiveIO Connector EJB
    4242 0.0.0.0 Remote Login Listener
    8019 0.0.0.0 Tomcat Connector AJP
    8080 0.0.0.0 Jetty Connector HTTP
    8090 0.0.0.0 Tomcat Connector HTTP
    8443 0.0.0.0 Jetty Connector HTTPS
    8453 0.0.0.0 Tomcat Connector HTTPS
   61616 0.0.0.0 ActiveMQ Message Broker Connector
  Started Application Modules:
    EAR: org/apache/geronimo/Console
    WAR: org/apache/geronimo/applications/Welcome
  Web Applications:
    http://hcunico:8080/
    http://hcunico:8080/console
    http://hcunico:8080/console-standard
Geronimo Application Server started
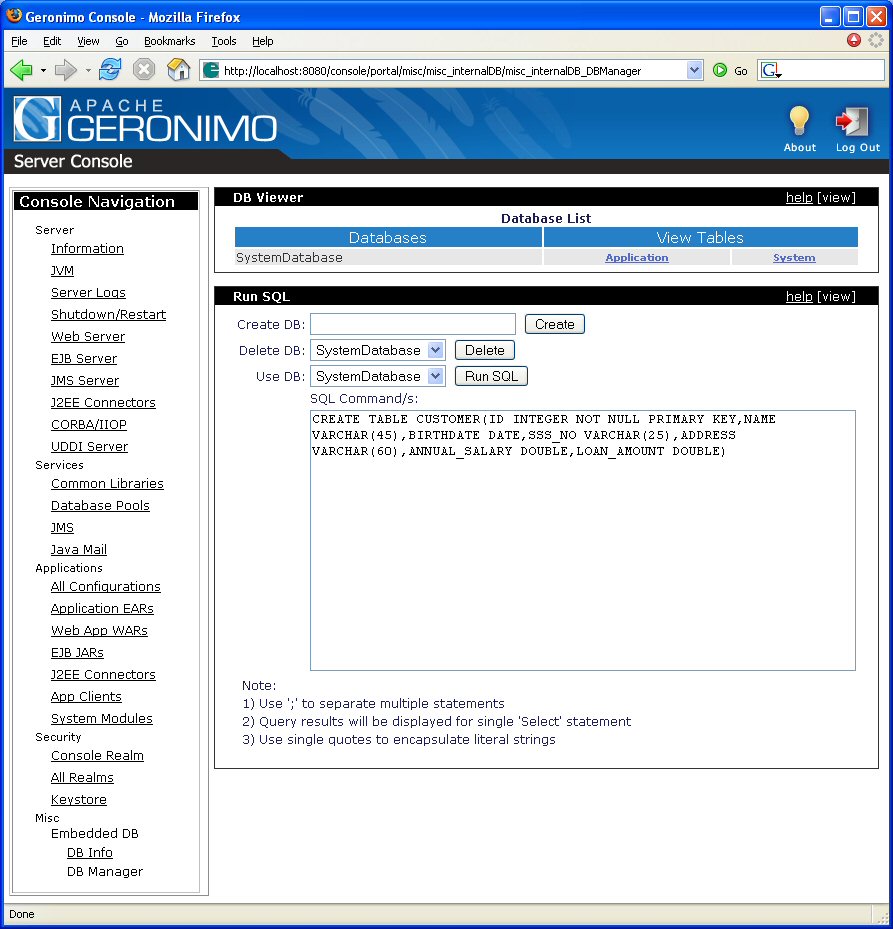
Access the Geronimo Console by pointing your Web browser to the following URL:
Enter the following system as the username and manager as the password, click Login.
Once logged in, on the bottom left corner from the left navigation panel click on DB Manager. In the text area labeled SQL Command/s enter the following SQL statement and click Run SQL; this will create the table used by the Entity Bean.
CREATE TABLE CUSTOMER(ID INTEGER NOT NULL PRIMARY KEY,NAME VARCHAR(45),BIRTHDATE DATE,SSS_NO VARCHAR(25),ADDRESS VARCHAR(60),ANNUAL_SALARY DOUBLE,LOAN_AMOUNT DOUBLE)
You should set the maven.geronimo.home property in project.properties to point to your <geronimo_home> directory.
The same EJB jar file that was created and deployed in jboss may be deployed in Geronimo with no changes to its contents but you still need to edit the jndi properties of sample application. Edit the jndi.properties file located in in the <bmp_home>/jndi directory as shown in the following example:
####################################################################
### JBoss Settings
####################################################################
#java.naming.factory.initial=org.jnp.interfaces.NamingContextFactory
#java.naming.factory.url.pkgs=org.jboss.naming:org.jnp.interfaces
#java.naming.provider.url=localhost


####################################################################
### Geronimo Settings
####################################################################
java.naming.factory.initial=org.openejb.client.RemoteInitialContextFactory
java.naming.provider.url=localhost:4201
java.naming.security.principal=username
java.naming.security.credentials=passwd
The following example shows the customer-ejb.xml deployment plan used for deploying the EJB application, this deployment plan in located in the <bmp_home>/dd directory.
This plan sets geronimo/system-database/1.0/car as the parent. What follows is the definition of the entity bean. The jndi-name element indicates the jndi name of the entity bean's home interface CustomerHomeRemote. This is the name that the Loan BMP sample application will lookup in the jndi context. The element local-jndi-name indicates the jndi name of the local interface, which in this case happens to be a remote interface, CustomerRemote. Next, a reference to the SystemDatasource is defined giving the application access to the database.
The Web Application client can be directly deployed in Geronimo. This is because the build step packages both the JBoss jboss-web.xml and Geronimo geronimo-web.xml specific deployment plans in the war file. You can see both of these files in the <bmp_home>\src\webapp\WEB-INF directory.
The geronimo-web.xml deployment plan should look like the following example.
Build the Loan BMP application by typing maven from the <bmp_home> directory. This will create the entity-ejb-SNAPSHOT.jar and entity-ejb.war in the <bmp_home>/target directory.
To deploy the migrated Loan BMP application, make sure the Geronimo server is up and running.
From a command line, change directory to <geronimo_home> and type the following command:
java -jar bin/deployer.jar --user system --password manager deploy <bmp_home>/target/entity-ejb-SNAPSHOT.jar <bmp_home>/dd/customer-ejb.xml
With this command you first tell the deployer tool where is the module to deploy, then you tell the deployer tool how to deploy the application by specifying the deployment plan.
Deploy the Web Application by typing the following command:
java -jar bin/deployer.jar --user system --password manager deploy <bmp_home>/target/entity-ejb.war
From the command line change the the <bmp_home> directory and type the following command:
maven run:client
You should see something similar to the following example:
E:\loan-bmp>maven run:client
 __  __
|  \/  |__ _Apache__ ___
| |\/| / _` \ V / -_) ' \  ~ intelligent projects ~
|_|  |_\__,_|\_/\___|_||_|  v. 1.0.2

build:start:

run:client:
    [java] creating customer...
    [java] done.findByPrimaryKeyTest... 1
    [java] customer name: Customer 1
    [java] customer sss no: 2323232
    [java] customer loan amount: 0.0
    [java] customer annual salary: 0.0
    [java] customer birthdate: Thu Oct 27 00:00:00 EDT 2005
    [java] updating ejb...
    [java] done.findBySssNoTest... 2323232
    [java] customer name: Customer 2
    [java] customer sss no: 2323232
    [java] customer loan amount: 0.0
    [java] customer annual salary: 0.0
    [java] customer birthdate: Thu Oct 27 00:00:00 EDT 2005
BUILD SUCCESSFUL
Total time: 4 seconds
Finished at: Thu Oct 27 18:59:44 EDT 2005

E:\loan-bmp>
Test the applications the same way you tested on JBoss.
This article covered how to migrate a sample application, from JBoss to the Apache Geronimo application server. You followed step-by-step instructions to build the application, deploy and run it, and then migrate it to the Geronimo environment.
The following list summarizes the major differences found during this sample application migration.
|
|
Privacy Policy - Copyright © 2003-2009, The Apache Software Foundation, Licensed under ASL 2.0. |