|
|
| Home > Documentation > Apache Geronimo v1.0 - User's Guide > Migrating to Apache Geronimo > JBoss to Geronimo - Security Migration |
This article will help you migrate security applications developed for JBoss v4 to Apache Geronimo. This article is part of a series of migration articles covering different types of applications migration.
This article provides some details on the differences between these two application servers as well as a detailed step-by-step migration procedure for porting security application from JBoss v4 to Apache Geronimo. To define a common starting point (the source environment), this article provide steps for deploying the sample application into the JBoss source environment. Then you will be guided through the application migration and deployment process onto Apache Geronimo.
This article is organized in the following sections:
Support of J2EE features may vary from one vendor to another and different vendors provide different ways to extend respective specifications and default behaviors with custom ones. The purpose of this section is to provide comparison of similar JBoss and Geronimo features which were applied for the implementation of sample applications. You can use the information below to clearly identify the differences of these two servers and plan accordingly before migration from one to another.
Features | JBoss v4 | Apache Geronimo |
|---|---|---|
Custom login modules | Supports custom login modules. Custom login modules can be installed as part of the service archive (SAR). | Supports custom login modules |
J2EE security | Supports both declarative and programmatic J2EE security. | Supports both declarative and programmatic J2EE security. |
Deploying realm configuration | Supports deployment of realm configuration as part of the service archive (SAR). | Realm configuration can be deployed as part of the module or as part of the application. |
The Security application represents a sample application that exploits security related features in the JBoss. It represents a simple document manager in which users can view and upload documents. It consists of the following three pages:
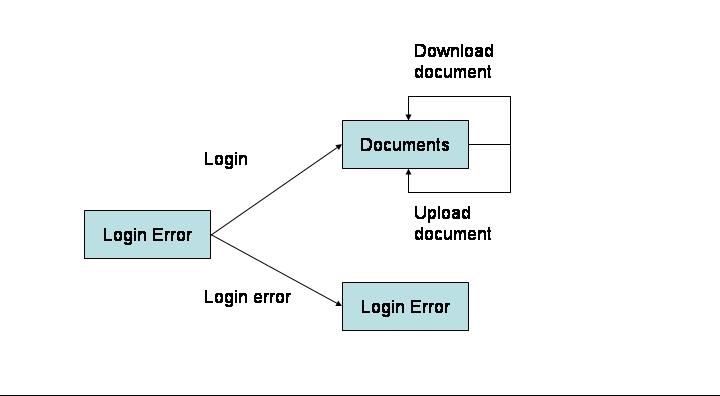
The application starts with the Login page. After logging in the user is redirected to the Documents page. There are two types of users - viewers and editors. Both kinds can view documents, but only the editor can upload them.
If a user has "editor" role, the upload form is displayed below the documents list. When the user selects a document and presses the "upload" button, the upload method of the BusinessLogic EJB is invoked through the execution of the "Upload" servlet. The Security application will throw an exception if a non-authorized user attempts to call the upload servlet.
Users are defined through the property files j2g_users.properties and j2g_groups.properties located in the <security_home>/properties directory.
Two predefined users are "user" with password "1" and "editor" with password "2".
The Application contains the following JSP pages:
The tools used for developing and building security sample application are:
The Eclipse with JBoss IDE plug-ins was used for development of Java-source code of the sample applications. Eclipse is a very powerful and popular open source development tool. Eclipse can be downloaded from the following URL:
JBoss plug-ins are also open source extensions for Eclipse that add some helpful features for creation of J2EE applications (which are not designed for deployment on JBoss only). These plug-ins can be downloaded from the following URL:
Ant is a pure Java build tool. It is used for building the war files and populating the database for the Online Brokerage application. Ant can be downloaded from the following URL:
XDoclet is a tool for generating various artifacts (deployment descriptors, source code) basing on the JavaDoc tags. XDoclet can be downloaded from the following URL:
http://xdoclet.sourceforge.net
This section shows you how and where the sample JBoss reference environment was installed so you can map this scenario to your own implementation.
Detailed instructions for installing, configuring, and managing JBoss are provided in the product documentation. Check the product Web site for the most updated documents.
The following list highlights the general tasks you will need to complete to install and configure the initial environment as the starting point for deploying the sample application.
run.sh -c <your_server_name> command from the <jboss_home>\bin directory.Compilation of source code of the sample applications is based on Java libraries distributed along with JBoss. The only additional software which is required for building the applications is Apache Ant.
If you do not have Ant installed, this is a good time for doing so and making sure that <ant_home>\bin directory is added to the path system environment variable. Apache Ant can be downloaded from the following URL:
If you do not have XDoclet installed, this is a good time for doing so. Although XDoclet installation is not required to build the sources at this time. It will be required for modifying the source code. The XDoclet can be downloaded from the following URL:
http://xdoclet.sourceforge.net
The Security sample application included with this article provides an Ant script that you will use in order to build the application. Download the Securityapplication from the following link:
After extracting the zip file a security directory is created, from now on this directory will be referred as <security_home>. In that directory open the build.properties file and edit the properties to match your environment as shown in the following example:
# Home directory of JBoss 4.0.2 J2ee Application Server and name of the server
# instance on which the application should be deployed (JBoss is also used for
# building purposes):
jboss.home = <jboss_home>
jboss.server = <your_server_name>
After the properties are specified run the command ant all in the same directory. Ant will build the Enterprise application archive containing the sample application for JBoss. The archives together with any additional required files (if any) will be placed into the <security_home>/build/jboss directory.
To deploy the Security application on JBoss, copy the security.ear from the <security_home>/build/jboss directory into the <jboss_home>\server\<your_server_name>\deploy directory.
If JBoss is running, it will automatically deploy and start the application. Otherwise, the application will be deployed and started at the next invocation of the application server.
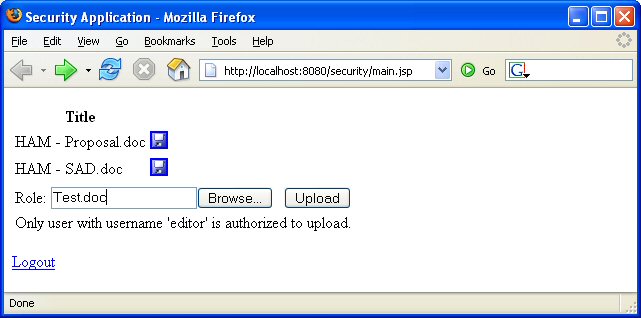
To test the application, open a Web browser and access the following URL:
http://localhost:8080/security
Try logging in as "user" and as "editor". Try invoking upload servlet directly typing the following URL in the browser http://localhost:8080/security/upload, you should receive an exception if you do not use an "editor" type user.
Download and install Geronimo from the following URL:
http://geronimo.apache.org/downloads.html
The release notes available there provide clear instructions on system requirements and how to install and start Geronimo. Throughout the rest of this article we will refer to the Geronimo installation directory as <geronimo_home>.
TCP/IP ports conflict
If you are planning to run JBoss and Geronimo on the same machine consider to change the default service ports on, at least, one of these servers.
Geronimo does not have an equivalent of the JBoss service archives (SARs). In the Security sample application, this archive is used for deploying the realm configuration on JBoss. In the case of Geronimo, this configuration can be placed in the application-wide Geronimo deployment plan geronimo-application.xml.
The following steps were performed to migrate the sample application:
Note that in contrast to JBoss, application roles must be explicitly defined in the deployment plan.
Since the realm configuration is done in the geronimo-application.xml, the SAR archive is not required anymore. Actually, this archive can contain custom login modules as well, but since there is some difficulties regarding the deployment of custom login modules to Geronimo (see JIRA GERONIMO-1044 ) they are not covered in this article.
In order to build modules of the Security application file for Geronimo, make sure that the properties starting with the prefix jboss still match your environment. The build scripts still refer to JBoss libraries for J2EE API interfaces required for the source code compilation.
You can update the classpath in the build.xml file to point to Geronimo and get the jars from there and not from JBoss.
After the properties have been specified, run the ant all command in the <security_home> directory. Ant will build the Enterprise application archive containing the sample application for Geronimo. The archives together with additional required files (if any) will be placed in the <security_home>/build/geronimo directory.
The build system was updated to include Geronimo-specific deployment plan in the application modules. SAR archive was removed from the build.
To deploy the migrated Security application, make sure the Geronimo server is up and running.
Copy the properties files with users and groups definition from the <security_home>/properties directory to the <geronimo_home>/var/security directory
From a command line, change directory to <geronimo_home>/bin and type the following command:
java -jar deployer.jar --user system --password manager deploy <security_home>/build/geronimo/security.ear
Once the application is deployed, open a Web browser and access the following URL:
http://localhost:8080/security
Login with the same user name and password you used when testing the application from JBoss.
This article showed you how to migrate a Security application that exploits some of the J2EE security-related features such as EJB declarative security, Web declarative security and Web programmatic security.
In both environments built-in login module was used. This article showed that such kind of applications require minimal migration efforts, although in more complex cases there could be more time-consuming issues.
|
|
Privacy Policy - Copyright © 2003-2009, The Apache Software Foundation, Licensed under ASL 2.0. |