|
|
| Home > Documentation > User's guide > Administration > Administrative Tasks > Configuring security > Certificate Properties File Realm |
This realm type allows you to configure Web applications to authenticate users against it. To get to that point, you will need to first configure Geronimo to use a custom SSL port listener and to get to that point you will need to configure SSL keys and keystore. The following sections describe step-by-step how to configure each of these modules.
For this configuration we will create a new keystore, a new private key, a CSR and will import the CA reply
We already mentioned in the Administering Certificates section how to create a keystore and a private key, in this section we will complete the picture by generating a CSR and importing the CA's reply.
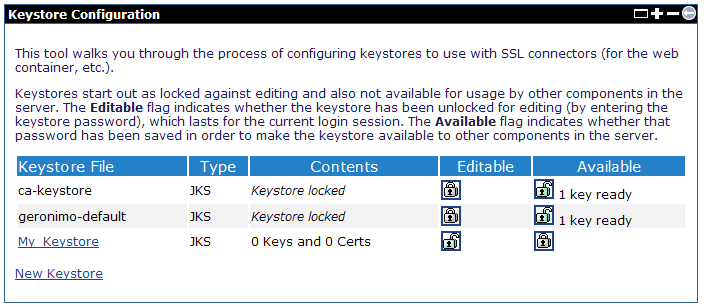
The keystores in Geronimo are stored in the <geronimo_home>\var\security\keystores directory, the default keystore already provided with the installation is geronimo-default. For this exercise we will create a new keystore.
From the Geronimo Administration Console click on Keystores to access the Keystore Configuration portlet.
Click on New Keystore, specify a new keystore name and password and then click on Create Keystore. For this example we used My_Keystore and password respectively.
Click on the keystore file you just created, and create a private key by clicking on the appropriate link.
Fill in with the appropriate data and click on Review Key Data.
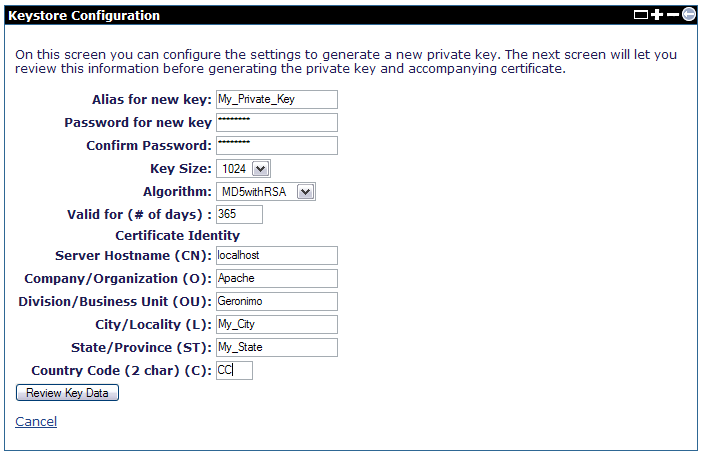
Once you verified the values are correct click on Generate Key.
Right after you created a new private key, this key is automatically locked. That means that you can only view it or delete it, to create a Certificate Signing Request (CSR) you will have to unlock the key. To do that click on Return to keystore list.
Click on the  to unlock the private key. You will be prompted with the password for the keystore and for the private key.
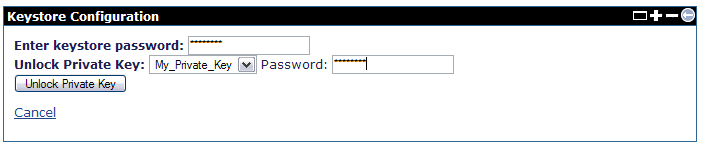
Click on Unlock Keystore.
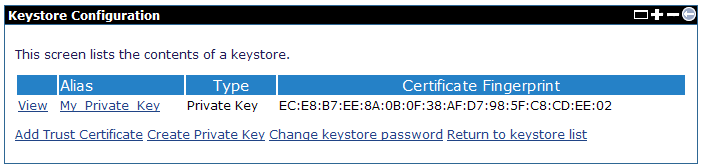
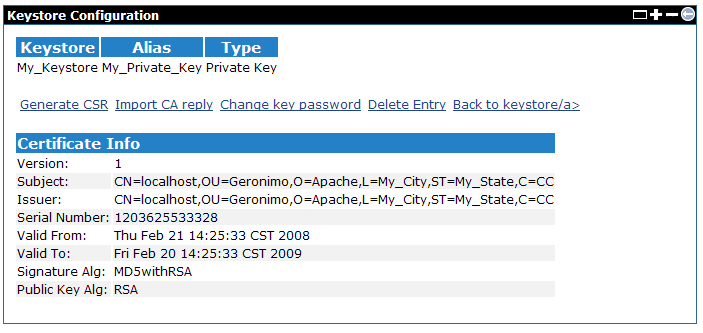
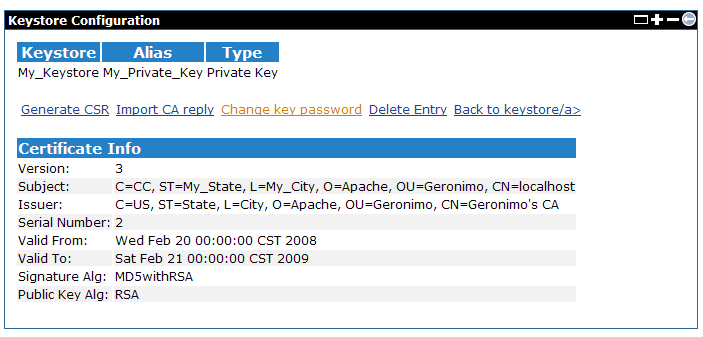
Now that you have the private key unlocked you may now continue to create a CSR. From the Keystore Configuration portlet click on the keystore file you created to display the current content. In this example we only have one private key. Click on either view or the alias links for the current private key to display the details and additional actions.
Click on Generate CSR, the certificate request should be displayed as illustrated in the following figure.
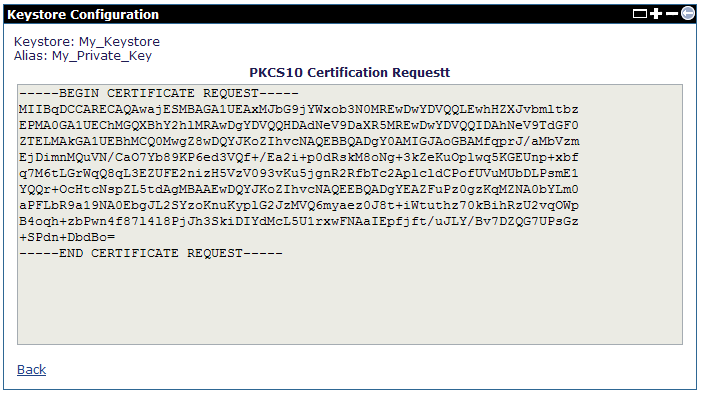
This is a PKCS10 certification request, you should copy this text and paste it into a flat txt file so it can be sent to a CA.
You can now click Back to return to the private key details portlet.
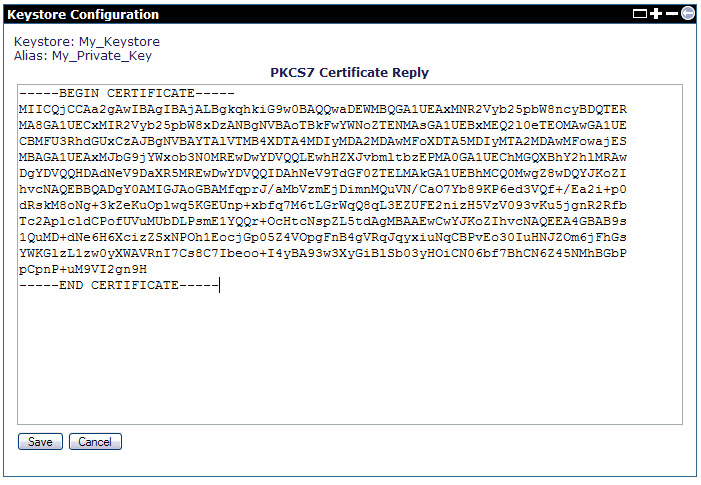
For this example we used a custom, home made CA so we could sign our own certificates for this test without altering the standard procedure. Assuming that you sent you CSR to a CA, the CA should respond back with another similar file containing the CA signed certificate.
From the private key details portlet click on Import CA reply. Remove any pre-filled text in the certificate reply window and paste the text from the CA reply file and click on Save.
After saving the CA reply you should now notice that the certificate now shows a different Issuer. Click on Back to keystore and then on Return to keystore list.
In order to enable client authentication you will need to import the CA who signed your CSR as a trusted certificate, this process has to be only once. The CA should provide along with the signed CSR a separate certificate for the CA itself. For this example we are using our own CA so we generated the following CA certificate.
While in the Keystore Configuration portlet click on the keystore file you created and then click on Add Trust Certificate. Delete any pre-filled content from Trusted Certificate window and paste the content from the CA certificate and add an alias to this certificate.
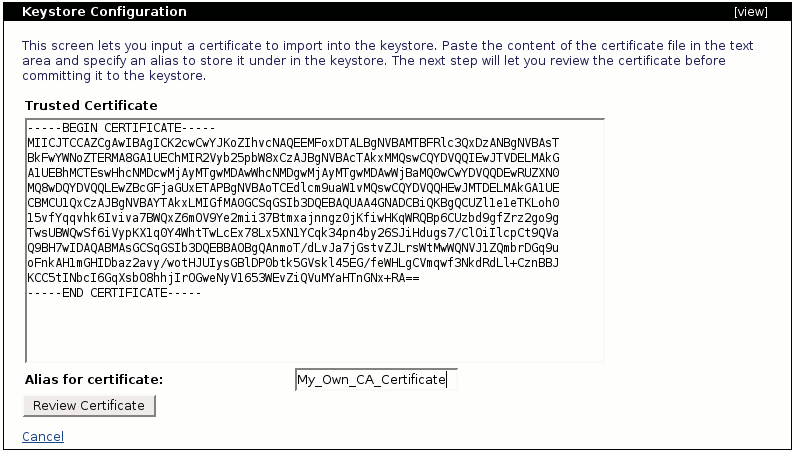
Click on Review Certificate and then click on Import Certificate. You should now see the trusted certificate you just imported.

To use a client certificate to authenticate against web server, you should first install the CA certificate and the client certificate into your web browser. Install a CA certificate to designate this CA as trusted and thus, grant access to any web sites certified by this CA. If not installed, accessing web sites certified by this CA leads to a warning message suggesting the "Web Site Certified by an Unknown Authority".
Most browsers provide such installation function. When using Mozilla Firefox, certificates can be installed with the Import option in the Certificate Manager.
Apache Geronimo comes with a predefined HTTPS listener on port 8443 but this listener is not configured for client authentication. In this example we will add a new HTTPS listener and configure it to request client authentication using the certificates we created and imported in the previous steps.
Note that in this example we are using the Tomcat distribution of Geronimo, although the process is the same some names and links may vary slightly if you are using the Jetty distribution.
From the Geronimo Administration Console click on Web Server to access the Network Listener portlet.
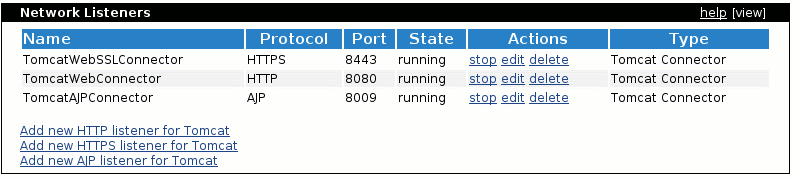
From the Network Listener portlet click on Add new HTTPS listener for Tomcat
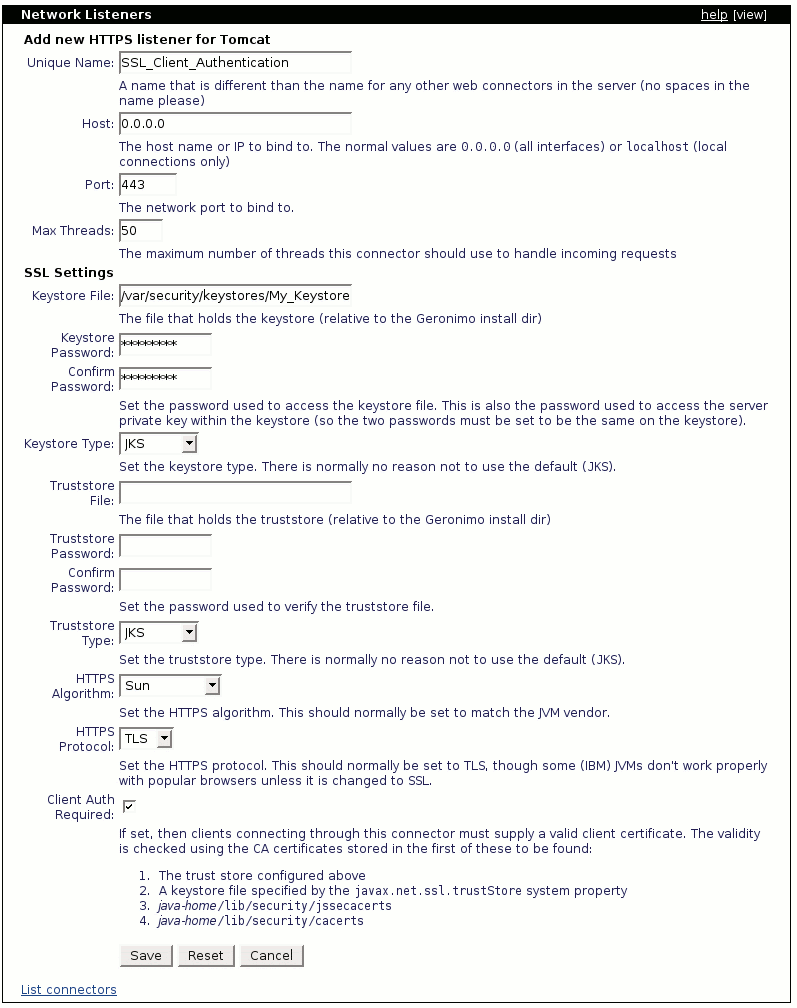
Fill in the fields with the appropriate data and click Save. For this example we only specified the keystore and not a trustore. When specifying the keystore file path you should add something similar to var/security/keystores/<your_keystore>, this path is relative to Geronimo's installation home directory.
Select the Client Auth Required check box, this tells the HTTPS listener to only establish an encrypted connection with a client that provides a valid client certificate. The client certificates are verified against the CA certificates stored in any of these locations (in order):
Once you saved this HTTPS network listener configuration it will get started automatically as you can see in the status displayed. If you try to access this port with your browser it should fail because at this point you have not configured your client with a valid certificate.
After you configured the HTTPS listener with client authentication, you can add a Certificate Properties File Realm to authenticate web applications.
To create a new security realm, click Add new security realm from the Security Realms portlet. Enter the name of security realm and select Certificate Properties File Realm from the Realm type: dropdown menu. Click Next and follow the instructions.
The properties files should be based on the client certificate intended to be used for client authentication. For example, a Certificate Properties File Realm CertificatePropsRealm with the user and group properties files based on My_Private_key created in the #Create keystore and certificate section is as follows:
client1 is based on the information of My_Private_key.The deployment plan of the Certificate Properties File Realm CertificatePropsRealm is as follows:
where
<moduleId> .. </moduleId>:defines the module ID of the security realm. Applications which use this security realm for authentication should include this attribute as a dependency in the deployment plan.<attribute name="realmName">CertificatePropsRealm</attribute>:CertificatePropsRealm is the name of the security realm.Configure the deployment descriptor and deployment plan of your web application to use the Certificate Properties File Realm for client authentication. The deployment descriptor is configured as follows:
where
<auth-method>CLIENT-CERT</auth-method>: suggests that the auth-method is set to CLIENT-CERT and thus, uses client certificate for authentication. CLIENT-CERT is often used for SSL mutual authentication. In Geronimo, such configuration suggests that a Certificate Properties File Realm is used for authentication with a client certificate.Web applications which use the CertificatePropsRealm security realm, for example, must configure their deployment plans as follows:
where
<security-realm-name>CertificatePropsRealm</security-realm-name>:CertificatePropsRealm is the Certificate Properties File Realm used for client authentication.<sys:dependency> .. </sys:dependency>:elements in this tag identify the module ID of the Certificate Properties File Realm used for authentication.You can install a client certificate into the web browser to authenticate against web servers. For the sample application described above which use the CertificatePropsRealm security realm, install the My_Private_key certificate into your web browser to verify your identity, in this case client1, during authentication. The installation process is provided in the Install certificate on client section below.
|
|
Privacy Policy - Copyright © 2003-2011, The Apache Software Foundation, Licensed under ASL 2.0. |