|
|
| Home > Documentation > User's guide > Installation and configuration |
This article provide details about the Apache Geronimo installation. Here you will find information about what are the prerequisite software, where to download Geronimo from and how to customize the installation to use custom ports other than the defaults.
In this document you will also find details about the installation and configuration of different topologies such as 2-tier with remote Web server.
This article is organized in the following sections:
Apache Geronimo v2.1 builds on J2SE 1.5 using Maven 2, get the appropriate JVM versions from the following sites.
Note: Ensure that after installing Java in your system the <java_home>/bin directory is added to the system PATH and also ensure that both variables JAVA_HOME and JRE_HOME are also defined.
Apache Geronimo v2.1 is a JEE5 Certified server, downloads are provided for both Windows and Unix (including Linux, Mac OS X) operating systems. In addition to the platform specific downloads, Geronimo is available in three main distributions which are the Java EE 5 Certified (Big-G), Little-G and Geronimo Framework. As suggested by the name, only the first one has full support of all the features and functions in the JEE 5 specification and has passed SUN's JEE5 Certification Test Suite (CTS).
Little-G distribution includes a Web container and a subset of other modules from the certified Geronimo distribution. This is not a Java EE 5 compliant server but it is probably more appealing to users that look for a smaller footprint with specific functionality. Both distributions, JEE 5 Certified and Little-G, are available with two different web containers ( Tomcat 6 and Jetty 6 ).
The third distribution, Geronimo Framework, offers just that, a stripped down framework for you to build up your own custom Geronimo server based on the available plugins. Unlike Little-G, this distribution does not include a web container, it only provides the bare minimum support for installing plugins. This is particularly practical since Geronimo v2.1 is built up entirely from plugins, see the Plugin infrastructure section for additional details.
The source code and binaries for Geronimo v2.1 can be found at the following URL
http://geronimo.apache.org/downloads.html
From a command line console uncompress the source code (.zip or tar.gz) and change directory <geronimo_home>.
Type the following command to build Apache Geronimo:
mvn install
When you build from the source, by default, you build all the distributions described earlier. Detailed steps and requirements to build Geronimo from the source are covered in depth in the Building Apache Geronimo section.
Depending on the platform you plan to install and run Apache Geronimo download the appropriate installation image. Select the appropriate file compression format for your operating system (.zip, .tar.gz) by clicking directly on the link, download it and expand the binary to your hard drive in a new directory.
The installation of Apache Geronimo is as simple as uncompressing the .zip or .tar files. From a command line window change directory to <geronimo_home>/bin and start the server using the following command:
geronimo run
For your convenience, Apache Geronimo provides a series of scripts to manage the server and applications, visit the Tools and commands section for further details.
Apache Geronimo provides a couple of configuration files where you can edit some of the parameter before starting the server. For instance, you can change the port numbers the server uses by updating the config-substitutions.properties file located in the <geronimo_home>/var/config directory. If you need to substitute one module with another you can use the artifact-aliases.properties or the client-artifact-aliases.properties files also available in the <geronimo_home>/var/config directory. In addition, you may also want to change the default user name and password and/or user groups. The files available in the <geronimo_home>/var/security directory allow you to make these changes.
Additional configuration changes can be made on the config.xml file available in the <geronimo_home>/var/config directory. The following sections cover more in detail how to make these changes.
list all configuration files, provide a general overview and a link to the full blown document (one for each file)
<geronimo_home>/var/config
<geronimo_home>/var/log
<geronimo_home>/var/security
Others ...
As we briefly mentioned earlier, the <geronimo_home>/var/config/config-substitutions.properties lets you specify a totally new set of port as well as to define an automatic port offset for when you run multiple servers (or instances of the same server). This file also allows you to set some cluster related parameters such as clusterName, clusterNodeName, etc. Visit the Clustering section for more details on how to configure a web application cluster in Geronimo.
Although this section is focusing on the changing these settings by updating a properties file there is an alternative way by using the Geronimo Administration Console which is explained in more detail under the Administration section. However, if you have port conflicts at start up time the Geronimo Administration Console will not be available, hence our focus on configuring the config-substitutions.properties file.
The following example shows the config-substitutions.properties for the Tomcat distribution of Geronimo. The file provided with the Jetty distribution is nearly identical.
#Fri Feb 08 14:11:53 EST 2008
DefaultWadiSweepInterval=36000
ResourceBindingsFormat={groupId}/{artifactId}/{j2eeType}/{name}
COSNamingPort=1050
HTTPPort=8080
ORBPort=6882
WebConnectorConTimeout=20000
COSNamingHost=localhost
clusterNodeName=NODE
ORBHost=localhost
webcontainer=TomcatWebContainer
NamingPort=1099
ORBSSLPort=2001
JMXPort=9999
ResourceBindingsNamePattern=
RemoteDeployHostname=localhost
ClusterName=DEFAULT_CLUSTER
DefaultWadiNumPartitions=24
MaxThreadPoolSize=500
ResourceBindingsNameInNamespace=jca\:
webcontainerName=tomcat6
ResourceBindingsQuery=?\#org.apache.geronimo.naming.ResourceSource
OpenEJBPort=4201
ORBSSLHost=localhost
SMTPPort=25
HTTPSPort=8443
AJPPort=8009
ActiveMQStompPort=61613
ActiveMQPort=61616
PortOffset=0
SMTPHost=localhost
ServerHostname=0.0.0.0
EndPointURI=http\://localhost\:8080
ReplicaCount=2
clusterName=CLUSTER_NAME
MinThreadPoolSize=200
There are a number of reasons why you may want to use other port numbers than those provided by default. Most common startup problems are in fact associated to port conflicts, you can use monitoring utilities like Active Ports that will quickly tell you what application/process is using what port so you can customize Geronimo's ports accordingly. Of course you can always use something like netstat -nab | grep -i list to get the ports in use along with what application is holding that port.
The default administration user name and password for the Geronimo Administration Console and command line deployment tool is system and manager respectively. You can change these defaults directly from the Geronimo Administration Console by accessing Security -> Console Realm and change the user name and password from the Console Realm Users portlet. See Configuring security for details.
Alternatively, you can make the same changes by editing the users.properties and groups.properties files, both located in the <geronimo_home>/var/security directory.
Important
Access to the <geronimo_home>/var/security directory should be appropriately secured. Different operating systems offer different alternatives to securing files and directories. Most cases would involve restricting permission to a specific user groups.
Passwords in users.properties are encrypted by the server. Passwords can be changed using the Geronimo Administration Console. They can also be changed using a text editor. While the server is stopped, simply edit the users.properties file. The password(s) will be encrypted the next time the server is started.
To prevent potential security exposures, we strongly recommend you update the default user names and passwords on your system.
Open the <geronimo_home>/var/security/groups.properties file and edit the contents of this file. Add any username that you require and save the file.
admin=user1,user2
Next, open the <geronimo_home>/var/security/users.properties file. You can change the password for the existing system account and/or add new users. When adding new users, the username has to be the same as the ones added to the groups.properties file.
user1=password1
user2=password2
In this example, two users have been added, user1 and user2 and the default system account has been deleted. Both user1 and user2 can access the console and the command line deployment tools.
Log into the Geronimo Administration Console and click on Users and Groups on the console navigation panel. This will display the Console Realm Users and Console Realm Groups portlets.
Visit the Configuring security section for more details on all the security related settings.
In today's globalized world, modern organizations face a lot of opportunities and challenges every day. Many of these challenges can put an onus on the organization's IT infrastructure therefore its configuration is crucial. The Apache Geronimo application server supports small-to-medium-sized enterprise applications and provides robust, secure support for the latest J2EE specification. This section will highlight the different configuration options that can be used in your production environment.
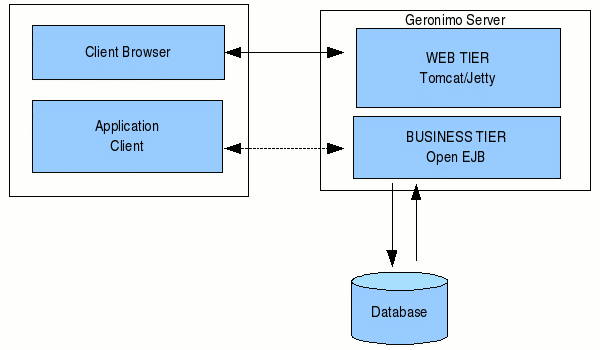
The figure below illustrates a client machine accessing an application hosted in the Geronimo server. Although the figure depicts only one client machine, several machines can be connected to the server and users on these machines can access the hosted Web applications using a standard Web browser.
The client-side application may vary ranging from being a simple command line user interface to a full-fledged user interface such as those created using popular client-side GUI technology. These applications can access the Web tier by connecting to the server using their own HTTP connections, or they can access business and EIS tier objects through the help of the Geronimo client application container.
Features of the Geronimo application client:

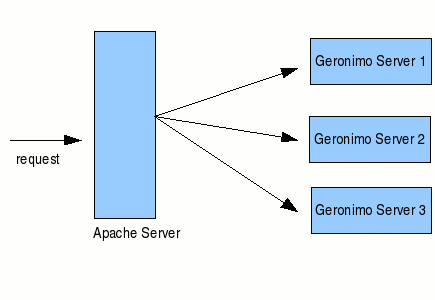
Three tier architecture system is more scalable than two tier as it supports hundreds of users and organizations. It also increases flexibility and freedom.
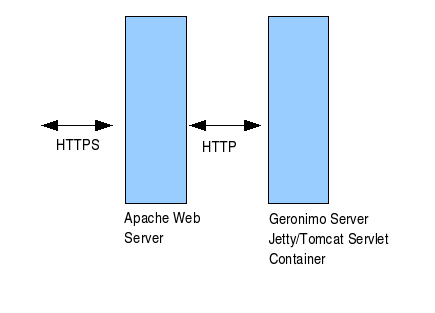
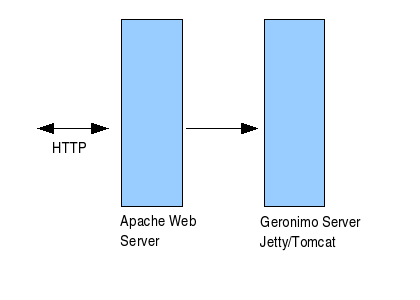
The Apache Web server is the best, and most popular, HTTP server software in use on the Internet today. In your production environment using Geronimo with the Apache Web server would give you some rigorous advantages as given below.
Using the Geronimo application server lets you build a secure enterprise infrastructure conforming to the latest standards and requirements. This article gave you an insight into custom configuration of the standard Geronimo installation, with several installation methods.
|
|
Privacy Policy - Copyright © 2003-2011, The Apache Software Foundation, Licensed under ASL 2.0. |