|
|
| Home > Documentation > User's guide > Migrating to Apache Geronimo > JBoss to Geronimo - Servlets and JSPs Migration |
This article will help you migrate servlets and JSPs deployed JBoss v4 (4.0.2 in the example) to Apache Geronimo 2.1 (2.1.4 in the example). This article is part of a series of migration articles covering different types of applications migration.
This article covers the migration one of the most fundamental aspects of J2EE; servlets and JSPs. The sample application used for this migration exercise is College Fest which just contains servlets and JSPs for handling the flow of control. The College Fest sample application does not use any database, for details on migrating JDBC applications refer to the JBoss to Geronimo - JDBC Migration article.
After reading this article you should be able to reconfigure the JBoss build files and the deployment descriptors to set up the Apache Geronimo destination environment and then deploying simple Web applications.
This article is organized in the following sections:
Servlets and JSPs implementations may vary from one application server to another. The purpose of this section is to provide servlets and JSPs specific feature-to-feature comparison between JBoss and Apache Geronimo so you can clearly identify the differences and plan accordingly before migration.
Apache Geronimo includes a Web application container supporting J2EE Web applications. The Web container itself supports basic configuration such as network ports and SSL options, and each Web application may include Geronimo-specific configuration information as well. Web applications participate in the Geronimo security infrastructure, so authenticating to a Web application allows access to secure EJBs and Connectors as well.
Apache Geronimo currently supports two Web containers: Jetty and Tomcat.
Jetty is a 100% Java HTTP Server and Servlet Container. This means that you do not need to configure and run a separate Web server in order to use servlets and JSPs to generate dynamic content. Jetty is a fully featured Web server for static and dynamic content.
Unlike separate server/container solutions, Jetty's Web server and Web application run in the same process without interconnection overheads and complications. Furthermore, as a pure java component, Jetty can be easily included in your application for demonstration, distribution or deployment. Jetty is available on all Java supported platforms.
In Geronimo, you need to explicitly configure the pathways used by browsers attempting to connect to the Web container. In the case of Jetty, the default Web container, these pathways are known as connectors. The standard configuration includes a Jetty connector supporting HTTP on port 8080, as well as a HTTPS connector on port 8443.
Each Jetty connector is a GBean, so the process of configuring a Jetty connector involves configuring a GBean.
Apache Tomcat is the servlet container that is used in the official Reference Implementation for the Java Servlet and JavaServer Pages technologies.
http://java.sun.com/products/servlet
http://java.sun.com/products/jsp
JBoss v4 supports only Tomcat 5.5, which is the default Web container. The embedded Tomcat service is the expanded SAR jbossweb-tomcat55.sar in the deploy directory. The web.xml file that provides a default configuration set for Web application is also found in this exapanded SAR directory structure.
The HTTP connector is set up on port 8080 and port 8009 is used if you want to connect via a separate Web server such as Apache HTTP.
In addition to the default Web container, the second major difference lies in the deployment plan. A deployment plan in Geronimo is similar to a J2EE deployment descriptor in the sense that it is an XML file that contains the configuration information for a specific application module or service.
For very simple Web applications with no security nor resource references, a Geronimo deployment plan is not required, a default context root and dependencies will be provided automatically at deployment time.
The Geronimo Web application deployment plan is geronimo-web.xml. The corresponding deployment descriptor in Jboss is jboss-web.xml. For further details on Geronimo deployment architecture you may refer to the Understand Geronimo's deployment architecture article.
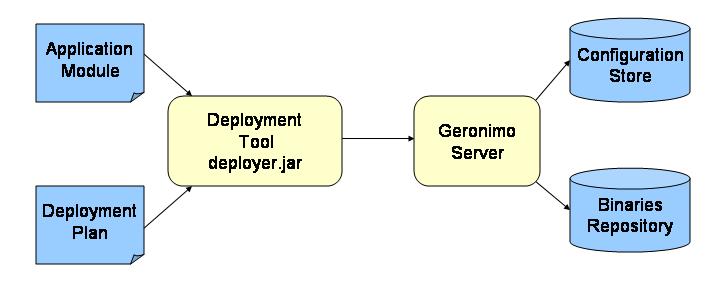
Another difference with servlets and JSPs lies in the way the Web application is deployed. In Geronimo, the application package (ear, war, rar or jar) is deployed using the deployment tool deployer.jar located in the <geronimo_home>/bin directory.
The deployer.jar deploys the application module based on the information provided in the deployment plan (if a plan is provided) to the Geronimo server. The server then saves the metadata to a configuration store and the executables to a binary repository. The following figure illustrates the behavior of the deployment tool.
In JBoss, a Web application is deployed by simply copying the application package (ear, war, rar or jar) into the <jboss_home>/server/<your_server_name>/deploy directory from where the server detects its presence and deploys it accordingly.
The following table summarizes the differences between JBoss and Geronimo.
Feature | JBoss v4 | Apache Geronimo |
|---|---|---|
Deployment descriptor/plan | jboss.xml | geronimo-web.xml |
Method of deployment | Copy the package (ear, war, rar or jar) to the deploy folder of the JBoss server <jboss_home>/server/<your_server_name>/deploy | Deployer tool available in server's bin directory |
Web container | Apache Tomcat 5.5 | Jetty and/or Apache Tomcat |
The College Fest application handles registration for events at a college festival. This is a very simple application that does not use any type of database. The College Fest application has the following four pages:
The following figure illustrates the application flow:
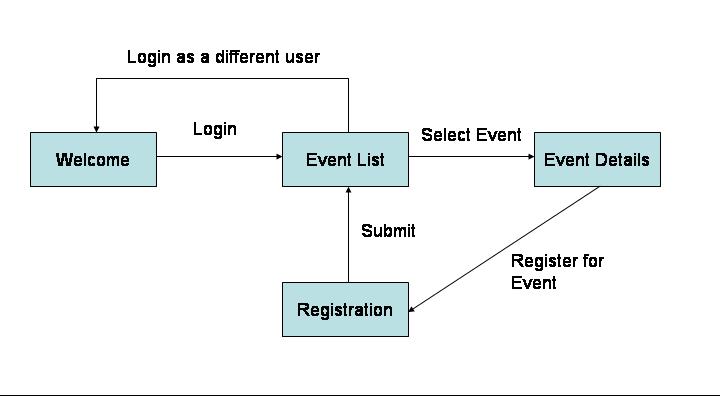
The user access the Welcome page and enters user name and college. From there the user can see the list of available events. The user can access the details for each Event by clicking them from the list. From the Event details page the user can register for that particular event.
The College Fest sample application consists of the following two servlets:
The College Fest sample application also includes the following JSP pages:
The tools used for developing and building the College Fest sample application are:
The Eclipse IDE was used for development of the sample application. This is a very powerful and popular open source development tool. Integration plug-ins are available for both JBoss and Geronimo. Eclipse can be downloaded from the following URL:
http://www.eclipse.org
Ant is a pure Java build tool. It is used for building the war files for the College Fest application. Ant can be downloaded from the following URL:
http://ant.apache.org
This section shows you how and where the sample JBoss reference environment was installed so you can map this scenario to your own implementation.
Detailed instructions for installing, configuring, and managing JBoss are provided in the product documentation. Check the product Web site for the most updated documents.
The following list highlights the general tasks you will need to complete to install and configure the initial environment as the starting point for deploying the sample application.
run.sh -c <your_server_name> command from the <jboss_home>\bin directory.As mentioned before, Apache Ant is used to build the binaries for the College Fest application. If you do not have Ant installed this is a good time for doing it and make sure that <ant_home>\bin directory is added to the system's path variable.
Apache Ant can be downloaded from the following URL:
The College Fest application included with this article provides an Ant script that you will use in order to build the application. Download the College Fest application from the following link:
After extracting the zip file, a college_fest directory is created. In that directory open the build.properties file and edit the properties to match your environment as shown in the following example:
#Replace java.home with your jdk directory
java.home=<JAVA_HOME>
#Replace j2ee.home with the parent directory of lib/j2ee.jar
j2ee.home=<jboss_home>/server/<your_server_name>
#Replace with jboss home directory
jboss.server=<jboss_home>/server/<your_server_name>
#geronimo home directory
geronimo.home=<geronimo_home>
In the college_fest directory you can also find two build files, build.xml and jboss-build.xml. build.xml is the default build file so if you just type ant this file will be used for building the application. For this particular sample application the jboss-build.xml file is provided.
From a command line, still within the college_fest directory type the following command:
ant -f jboss-build.xml clean deploy
With this command, ant will use the targets defined in the jboss-build.xml file to build the College Fest application and deploy it to the JBoss server. Take a special look at <target name="deploy" ...>, here is where the jboss-build.xml tell ant where to deploy the WAR file. The following example shows the definitions in the jboss-build.xml file.
The war created by the ant build contains a JBoss specific deployment descriptor, the jboss-web.xml file in the WEB-INF directory of the WAR is shown in the following example.
The previous step showed how to deploy the application at build time by specifying a customized jboss-build.xml file. If you used the default build.xml file at build time you still need to deploy the College Fest application manually. To deploy the College Fest application in JBoss, copy the college_fest.war file you just built with Ant to the following directory:
<jboss_home>\server\<your_server_name>\deploy
If JBoss is already started, it will automatically deploy and start the application; otherwise, the application will be deployed and started at the next startup.
To test the application, open a Web browser and access the following URL:
http://localhost:8080/college_fest
You should see the Welcome screen where you can login with your name and college. When you enter your name a college and click Submit you will see a message at the end on the page stating your name with a link to "Click here" to enter the site. Browse the site and check the options, at this point the College Fest application is configured and running.
Download and install Geronimo from the following URL:
http://geronimo.apache.org/downloads.html
The release notes available there provide clear instructions on system requirements and how to install and start Geronimo. Throughout the rest of this article we will refer to the Geronimo installation directory as <geronimo_home>.
TCP/IP ports conflict
If you are planning to run JBoss and Geronimo on the same machine consider to change the default service ports on, at least, one of these servers.
In order to migrate the College Fest application to Geronimo you need to replace the jboss-web.xml file with a geronimo-web.xml file which is the Geronimo specific descriptor file. The geronimo-web.xml file is located in the WEB-INF directory withing the college_fest directory structure. The Geronimo deployment plan geronimo-web.xml is illustrated in the following example.
The following geronimo-web.xml was generated using the J2G tool.
Given that College Fest is a very simple application, the Geronimo deployment plan will also be very simple. Remember that this application does not use any database access nor has security configured. While reading other articles in the JBoss to Geronimo migration series, you will notice how the complexity of the deployment plan increases as the sample applications for the different migration scenarios also grow in complexity.
Earlier in this article it was discussed the behavior of the deployment tool. During the deployment process, you provide to the deployment tool the application module and a deployment plan. The College Fest sample application is so simple that you may choose not to provide any deployment plan and let Geronimo do the deployment with a default set of values (a default context root for example).
Last time you built the College Fest sample application it was configured for ant to use the jboss-build.xml file instead of the default build.xml. The following example shows the content of the default build.xml file.
To build the migrated application run ant from the command line without specifying any additional parameters, a college_fest.war file will be created in the root directory of the College Fest application directory structure.
To delete the generated files for a clean build run ant clean followed by an ant.
To deploy the migrated College Fest application, make sure the Geronimo server is up and running.
From a command line, change directory to <geronimo_home>/bin and type the following command:
deploy --user system --password manager deploy <college_fest_home>/college_fest.war
Once the application is deployed, open a Web browser and access the following URL:
http://localhost:8080/college_fest/
Repeat the steps you did when Testing the application on the JBoss environment.
This article has shown you how to migrate a simple Servlet and JSPs application, from JBoss to the Apache Geronimo application server. You followed step-by-step instructions to build the application, deploy and run it, and then migrate it to the Geronimo environment.
Some remarks after reading this article:
|
|
Privacy Policy - Copyright © 2003-2011, The Apache Software Foundation, Licensed under ASL 2.0. |