HomeDocumentation > Developing > Tutorials > Developing Web services > Developing Clients for a JAX-WS Web Service
{scrollbar}

This tutorial will take you through the steps required in developing, deploying and testing a Web Service Client in Apache Geronimo for a web services which are already deployed on the server

This tutorial will take you through the steps involved in creating a Web based Client and a POJO Client for a JAX-WS web service. It is required that you complete the Developing a JAX-WS POJO Web Service tutorial before completing this one. Since we will be using the WSDL file of the Web Service deployed for creating the client, ensure that the Web Service from the Developing a JAX-WS POJO Web Service tutorial is deployed and the Geronimo server is running before starting this tutorial.

Types of Web Services

For new users, Web Services can be created in two ways:

  • Bottom Up Web Service - creating web services from Java classes.
  • Top Down Web Service - creating web services from WSDL document.

This tutorial will help you in creating a Top Down Web Service from WSDL document which is already deployed on server.

To run this tutorial, as a minimum you will be required to have installed the following prerequisite software.

  1. Sun JDK 6.0+ (J2SE 1.6)
  2. Eclipse IDE for Java EE Developers, which is platform specific
  3. Apache Geronimo Eclipse Plugin 2.1.x
  4. Apache Geronimo Server 2.1.x

    Geronimo version 2.1.x, Java 1.5 runtime, and Eclipse Ganymede are used is used in this tutorial but other versions can be used instead (e.g., Geronimo version 2.2, Java 1.6, Eclipse Europa)

Details on installing eclipse are provided in the Development environment section.

Deployed Web Service

This tutorial assumes that you have completed the Developing a JAX-WS POJO Web Service tutorial. Here we will try to develop the client for the web service deployed in the above mentioned tutorial.

This tutorial will take you through the following steps:

2listpipe

Web based Client

The following steps will help you in creating a Web based Client for a JAX-WS Web Service which is already deployed on the server.

Create a Dynamic Web Project to consume the Web Service

  • From Eclipse main menu, select File --> New --> Other

  • In the New dialog, select Web --> Dynamic Web Project and click Next

  • Type jaxws-converterclient as the Project Name and click Next

  • On the Project Facets page, the default selections are enough.


  • Make sure that the check box Generate Deployment Descriptor is selected and click Next

  • On the Geronimo Deployment Page modify the Group Id to org.apache.geronimo.samples.jaxws and the Artifact Id to jaxws-converterclient.

  • Click Finish

Creating necessary stubs to consume Web Service

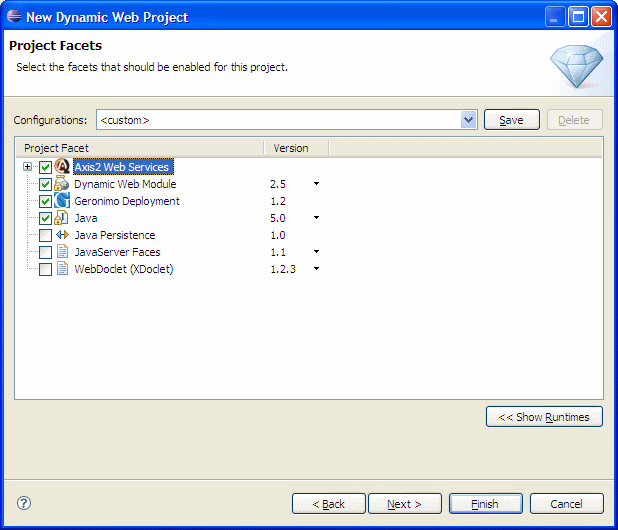
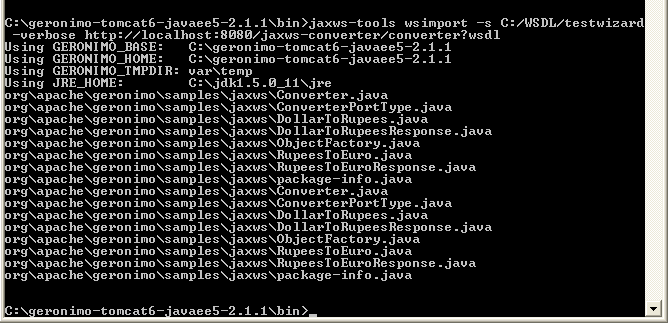
We need to create Service Endpoint Interface based on the WSDL document to use it in out JSP's. Luckily in Geronimo this can be automated using the jaxws-tools utility provided by Geronimo.

jaxws-tools.bat

Please take care that jaxws-tools.bat utility in server's bin directory may not work in old versions of Apache Geronimo.
Try using the latest version of Geronimo i.e v2.1.1 .

  • Open a command prompt and point it to the bin directory of server installation.

  • We will use the jaxws-tools utility provided in the server's bin directory to generate client stubs.

  • Use the following command to generate the necessary stubs that are needed to consume the web service.
Client Stubs Generationsolid <%SERVEER_INSTALLATION_BIN_DIR%>:\ jaxws-tools.bat wsimport -s C:\WSDL converter/converter?wsdl">http://localhost:8080jaxws-converter/converter?wsdl
  • Now all the stubs should have been created and placed in C:\WSDL directory. We will be needing only the class ConverterPortType for accessing Web Service.


  • Copy the files Converter.java and ObjectFactory.java and place them in the appropriate folder according to their package declaration

Let us walk through the steps that we just completed

  • Converter.java - This file extends the javax.xml.ws.Service and provides method to create a service and retrieve port which is the Service Endpoint Interface for the Web Service deployed.
  • ConverterPortType.java - This is the same file that is used to deploy the Web Service. This is the Service Endpoint Interface that is required to access the Web Methods exposed by the Service.
  • jaxws-tools.bat wsimport - This is the utility in Geronimo which takes the help of jaxws-tools provided by Sun to create client stubs

Developing the Web based Client

  • Right-click the jaxws-converterclient, and Select New --> JSP

  • Name the JSP as index.jsp and click Finish

  • Add the following code to the index.jsp
index.jspsolid <%@ page language="java" contentType="text/html; charset=ISO-8859-1" pageEncoding="ISO-8859-1"%> <html> <head> <title>Converter</title> <meta content="text/html; CHARSET=iso-8859-1" http-equiv="Content-Type"> </head> <body> <center> <h3>This from invokes a Web Service.</h3> <br> Please type an amount and click submit to see the result. <form action="index.jsp">Amount(in Dollars): <input type="text" name="amount"> <input type="submit" value="Submit"></form> <br><br> <jsp:include page="result.jsp"></jsp:include> </center> </body> </html>
  • Right click again and add another JSP named result.jsp

  • Add the following code to result.jsp
result.jspsolid <%@ page language="java" contentType="text/html; charset=ISO-8859-1" pageEncoding="ISO-8859-1"%> <%@page import="java.math.BigDecimal"%> <%@ page import="org.apache.geronimo.samples.jaxws.Converter"%> <%@ page import="org.apache.geronimo.samples.jaxws.ConverterPortType"%> <html> <head> <title>Converter</title> <meta content="text/html; CHARSET=iso-8859-1" http-equiv="Content-Type"> </head> <body> <% String amount = request.getParameter("amount"); if (amount != null && amount.trim().length() > 0) { out.println("<center>"); try { BigDecimal dollars = new BigDecimal(amount); Converter conv = new Converter(); ConverterPortType port = conv.getConverterPort(); BigDecimal rupees = port.dollarToRupees(dollars); BigDecimal euros = port.rupeesToEuro(rupees); out.println(dollars + " Dollars equals to " + rupees + " Rupees"); out.println("<br>"); out.println(rupees + " Rupees equals to " + euros + " Euros"); } catch (Exception e) { out.println("Error: " + e.getMessage()); } out.println("<center>"); } %> </body> </html>

This concludes the development section of our web based client.

Using <service-ref> element to consume Web Service:

  • In our previous result.jsp we accessed the Web Service by instantiating the Service class. This can slightly overhead the client application.

  • We can also use JNDI Naming service to directly access our web service without instantiating any Service class.

  • We need to add a service-ref element to web.xml to give necessary information about WSDL file location, Service name etc .,
Modified web.xmlsolid <service-ref> <service-ref-name>services/Converter</service-ref-name> <service-interface> org.apache.geronimo.samples.jaxws.Converter </service-interface> <wsdl-file> http://localhost:8080/jaxws-converter/converter?wsdl </wsdl-file> </service-ref>
  • Let us walkthrough the elements that we added to web.xml

    • service-ref-name - This is the name by which JNDI identifies our deployed service. The location that these services are located are java:comp/env/<service-ref-name>
    • service-interface - This is the interface which client uses to access the web service and create necessary stubs under covers. This interface should compulsorily extend either javax.xml.ws.Service or javax.xml.rpc.Service. Observer that this is not the Service-Endpoint Interface that we used to deploy the service.
    • wsdl-file - The location of WSDL file specified the location of deployed web service. Suppose the web service is deployed at *http://localhost:8080/jaxws-converter/converter*, then the WSDL file is located at *http://localhost:8080/jaxws-converter/converter?wsdl*

  • The changes required in accessing the service are as follows:
Modified result.jspsolid ........ <%@ page import="javax.naming.InitialContext" %> <%@ page import="javax.naming.Context" %> ........ Context ctx= new InitialContext(); Object obj = ctx.lookup("java:comp/env/services/Converter"); Converter service= (Converter) obj; ConverterPortType port = service.getConverterPort(); BigDecimal rupees =port.dollarToRupees(dollars); BigDecimal euros = port.rupeesToEuro(rupees); ........

Deploying and Testing the Web Client

Deploy

  • Right click on the Apache Geronimo Server Runtime present in the servers view and select Add and Remove Projects

  • Add jaxws-converterclient to configured projects list and then click Finish

  • Wait for some time till the server status changes to Synchronized

    Note that you may get some error and/or warning messages in the server console tab. These usually can be ignored as long as the projects deploy correctly, which they should.

Testing

  • Right click the index.jsp present under WebContent directory of our project and select Run As --> Run On Server


  • In the popup, check the check box Always use this server when running the project and then click Finish

  • Now Eclipse will try to open the JSP in a web browser which shows you a form to enter amount in Dollars.

  • Enter any amount and press submit, the jsp should display the result that is returned by the web service.


Converter

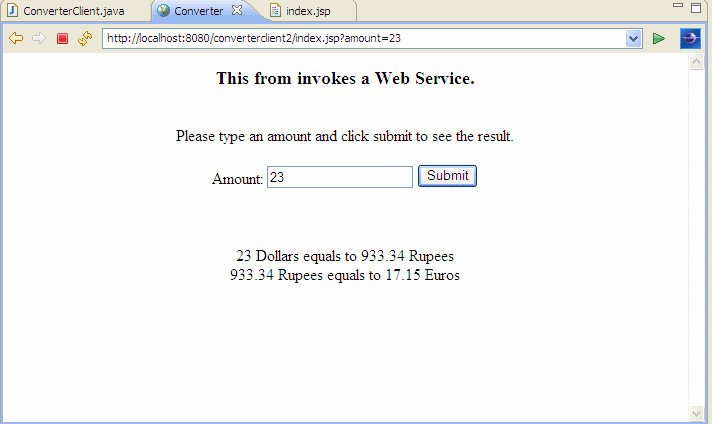
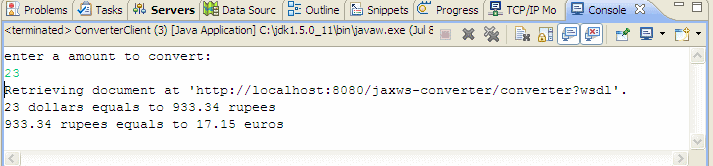
Note that we accessed the web service in the JSP by creating a service, and then retrieving the Converter port from the WSDL document.

POJO Client

Here we will have a look on how to create a plain old java client for consuming the web service.

Developing the Client

  • Create a Java Project

    • Select File --> New --> Project

    • In the popup window select Java --> Java Project and then click Next

    • Name the project as jaxws-converterpojoclient and click Finish in the New Java Project dialog.

  • Copy the files Converter.java and ConverterPortType.java into the appropriate package.

  • Add another class with the name ConverterClient.java in the same package.

  • Add the following code to the ConverterClient.java
ConverterClient.javasolid package org.apache.geronimo.samples.jaxws; import java.io.BufferedReader; import java.io.InputStreamReader; import java.math.BigDecimal; public class ConverterClient { public static void main(String args[]) { try { BufferedReader dataIn = new BufferedReader(new InputStreamReader( System.in)); System.out.println("enter a amount to convert:"); String number = new String(); number = dataIn.readLine(); BigDecimal amount = new BigDecimal(number); Converter conv = new Converter(); ConverterPortType port = conv.getConverterPort(); BigDecimal result = port.dollarToRupees(amount); System.out.println(amount + " dollars equals to " + result + " rupees"); BigDecimal result1 = port.rupeesToEuro(result); System.out.println(result + " rupees equals to " + result1 + " euros"); } catch (Exception e) { e.printStackTrace(); } } }

This completes the development section of our POJO client

Adding necessary jar files to the class path

Errors in Java Project

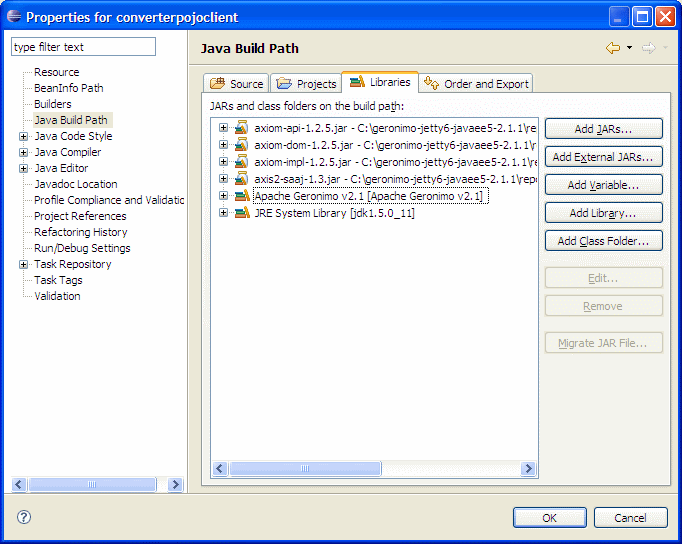
Now our Java project might show many errors and even if we resolve the errors the application may not run properly. This is due to the missing jar files required to access and understand SOAP messages sent by web service.

  • Right click the jaxws-converterpojoclient project and then select Properties

  • Select Java Build Path and then go to Libraries tab


  • Click on Add External JARs... and then add the axis2-adb-1.3.jar from the location <GERONIMO_INSTALL_DIR>/repository/org/apache/axis2/axis2-adb/1.3/ and then click Open Version Numbers

    The version numbers may differ slightly. It wont matter much.

  • Repeat the above step for the following external JARS
#ccc#FFFFCE#F7D6C1External JARS Required(Axis2)solid

axis2-adb-1.3.jar - <GERONIMO_INSTALL_DIR>/repository/org/apache/axis2/axis2-adb/1.3/axis2-adb-1.3.jar
axis2-java2wsdl-1.3.jar - <GERONIMO_INSTALL_DIR>\repository\org\apache\axis2\axis2-java2wsdl\1.3\axis2-java2wsdl-1.3.jar
axis2-jaxws-1.3.jar - <GERONIMO_INSTALL_DIR>\repository\org\apache\axis2\axis2-jaxws\1.3\axis2-jaxws-1.3.jar
axis2-kernel-1.3.jar - <GERONIMO_INSTALL_DIR>\repository\org\apache\axis2\axis2-kernel\1.3\axis2-kernel-1.3.jar
axis2-metadata-1.3.jar - <GERONIMO_INSTALL_DIR>\repository\org\apache\axis2\axis2-metadata\1.3\axis2-metadata-1.3.jar
axis2-saaj-1.3.jar - <GERONIMO_INSTALL_DIR>\repository\org\apache\axis2\axis2-saaj\1.3\axis2-saaj-1.3.jar
axiom-api-1.2.5.jar - <GERONIMO_INSTALL_DIR>\repository\org\apache\ws\commons\axiom\axiom-api\1.2.5\axiom-api-1.2.5.jar
axiom-dom-1.2.5.jar - <GERONIMO_INSTALL_DIR>\repository\org\apache\ws\commons\axiom\axiom-dom\1.2.5\axiom-dom-1.2.5.jar
axiom-impl-1.2.5.jar - <GERONIMO_INSTALL_DIR>\repository\org\apache\ws\commons\axiom\axiom-impl\1.2.5\axiom-impl-1.2.5.jar
XmlSchema-1.3.1.jar - <GERONIMO_INSTALL_DIR>\repository\org\apache\ws\commons\schema\XmlSchema\1.3.1\XmlSchema-1.3.1.jar
neethi-2.0.jar - <GERONIMO_INSTALL_DIR>\repository\org\apache\neethi\neethi\2.0\neethi-2.0.jar
wsdl4j-1.6.1.jar - <GERONIMO_INSTALL_DIR>\repository\wsdl4j\wsdl4j\1.6.1\wsdl4j-1.6.1.jar
xml-resolver-1.1.jar - <GERONIMO_INSTALL_DIR>\repository\xml-resolver\xml-resolver\1.1\xml-resolver-1.1.jar
xmlbeans-2.3.0.jar - <GERONIMO_INSTALL_DIR>\repository\org\apache\xmlbeans\xmlbeans\2.3.0\xmlbeans-2.3.0.jar
commons-codec-1.3.jar - <GERONIMO_INSTALL_DIR>\repository\commons-codec\commons-codec\1.3\commons-codec-1.3.jar
commons-httpclient-3.0.1.jar - <GERONIMO_INSTALL_DIR>\repository\commons-httpclient\commons-httpclient\3.0.1\commons-httpclient-3.0.1.jar
wstx-asl-3.2.1.jar - <GERONIMO_INSTALL_DIR>\repository\woodstox\wstx-asl\3.2.1\wstx-asl-3.2.1.jar

Also add Server Runtime Library to class path (i.e., via clicking on Add Library...) which reduces the effort for adding some more jars.

Note that these jars are used when JAX-WS Engine is configured as Axis2. If JAX-WS engine is configured as CXF the jars may differ slightly.

This completes the adding external JARs to the project

JRE 6

If you are running Java 6 you don't need to worry about the external JARs as they are all inbuilt into JRE 6. But you should copy all the files generated by wsimport command into appropriate packages as Runtime Modeller in Java 6 is slightly different.

Testing

  1. Now Right click the ConverterClient.class and select Run As --> Run as Java Application

  2. Now enter the amount in the console window of Eclipse

  3. The output will be shown which is retrieved by accessing the methods of Web service.


This completes the development and deployment of clients for consuming a Web Service. Even though this tutorial demonstrated for one particular Web Service, the method can be extended for any deployed web service.