|
|
| Home > Documentation > Developing > Tutorials > Developing application clients > Deploying and running EJB application clients |
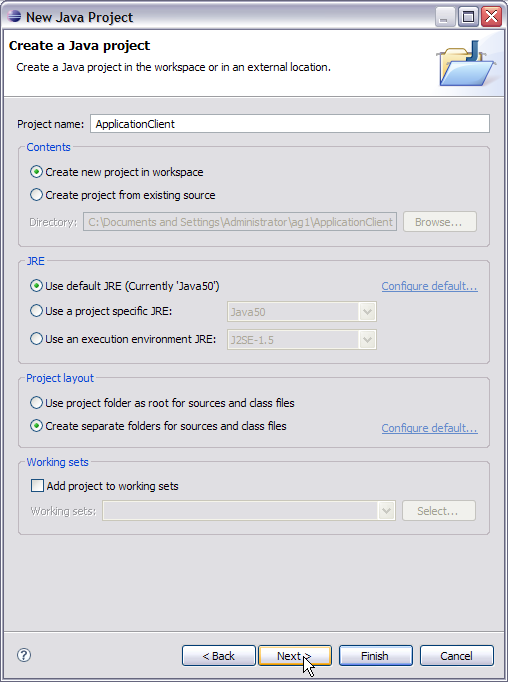
This tutorial walks you through configuring, developing and deploying an enterprise application with Eclipse and Geronimo. To run this tutorial, as a minimum you will be required to have installed the following prerequisite software.
Geronimo version 2.1.x, Java 1.5 runtime, and Eclipse Ganymede are used in this tutorial but other versions can be used instead (e.g., Geronimo version 2.2, Java 1.6, Eclipse Europa)
Details on installing eclipse are provided in the Development environment section. This tutorial is organized in the following sections:
Let us briefly understand this application. This application will take you through creating a simple Stateless Session EJB. Later we will develop a Java Application client to access this EJB. EJB development will make use of annotations which are introduced in Java EE5.
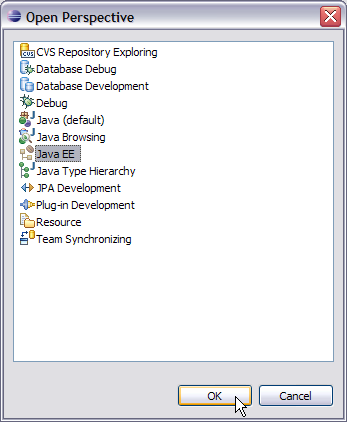
This completes the setting of Eclispe IDE for EJB application development.
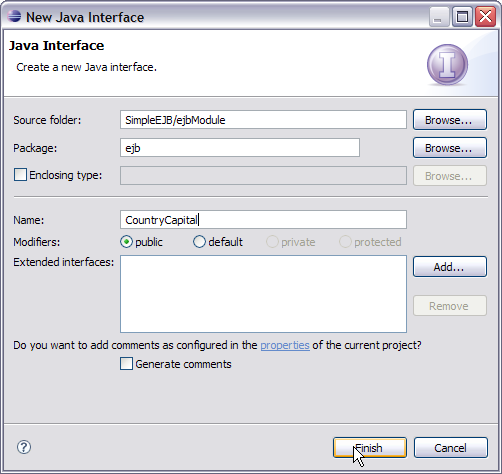
package ejb;

import javax.ejb.Remote;
@Remote
public interface CountryCapital {
	public String capitalName(String countryName);
}
package ejb;

import javax.ejb.Local;
@Local
public interface CountryCapitalLocal {
	public String capitalName(String countryName);

}

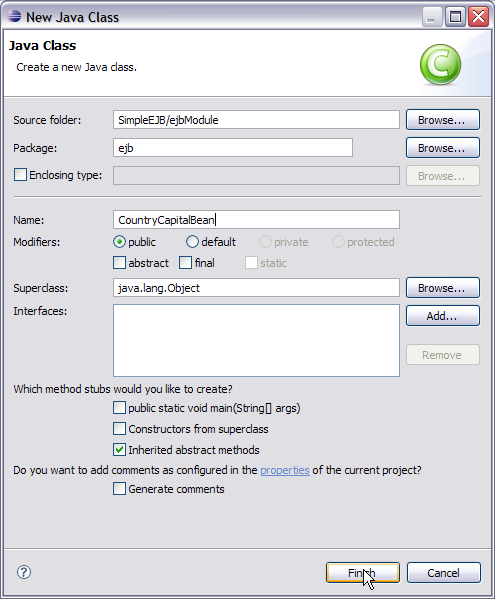
package ejb;

import javax.ejb.Stateless;
@Stateless
public class CountryCapitalBean implements CountryCapital,CountryCapitalLocal{
	public String capitalName(String countryName)
	{
		String capital=new String("No such country");
		if (countryName.equalsIgnoreCase("India"))
		{
			capital="New Delhi";
		}
		if (countryName.equalsIgnoreCase("United States Of America"))
		{
			capital="Washington DC";
		}
		if (countryName.equalsIgnoreCase("China"))
		{
			capital="Beijing";
		}

		return capital;

	}

}
This completes the development of EJB application.

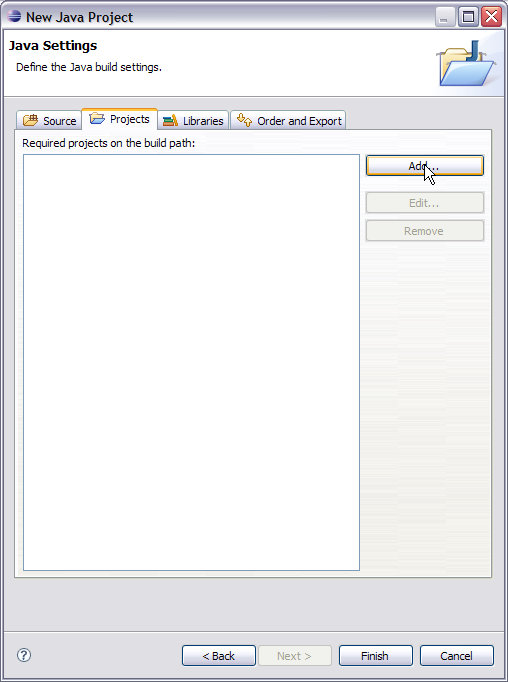
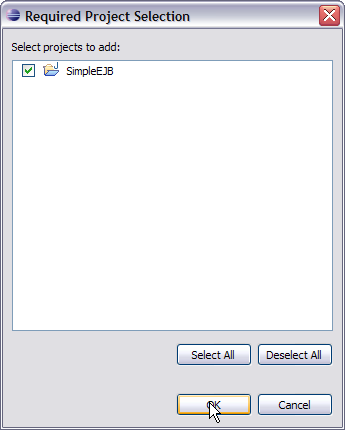
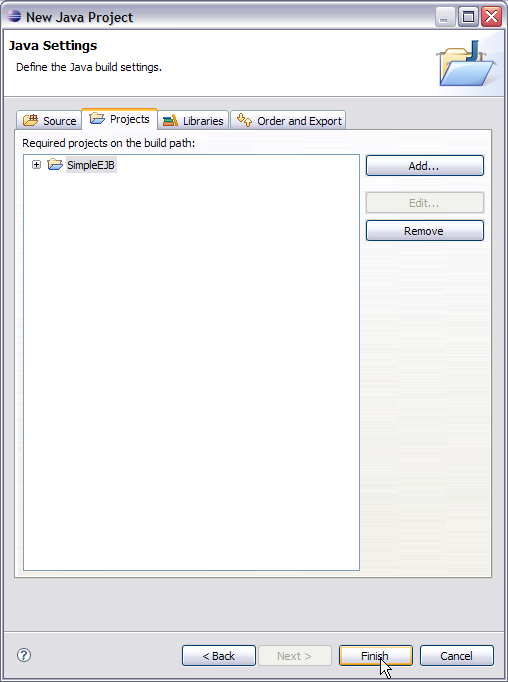
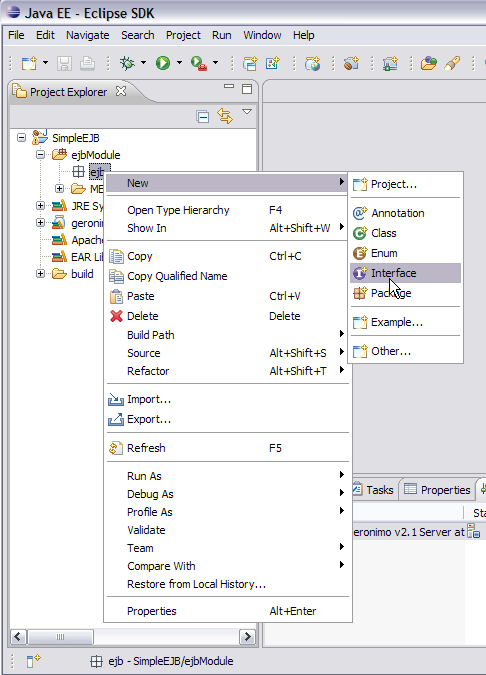
Why did we add the EJB project to build path ??
This is because the build path is used to find the classes referenced by your Application Client source code, and these classes will be required for compilation of Application Client source code.

ApplicationClient.java class with the following code:
package appclient;

import java.io.BufferedReader;
import java.io.InputStreamReader;
import java.util.Properties;
import ejb.CountryCapital;
import javax.naming.Context;
import javax.naming.InitialContext;

public class ApplicationClient {
	 public static void main(String [] args)
	 {
		 String capital=new String();
		 try{
			 Properties prop=new Properties();
			 prop.put(Context.INITIAL_CONTEXT_FACTORY, "org.apache.openejb.client.RemoteInitialContextFactory");
				prop.put("java.naming.provider.url", "ejbd://localhost:4201");
	 Context context = new InitialContext(prop);

	 CountryCapital myejb =
	 (CountryCapital)context.lookup("CountryCapitalBeanRemote");
	 System.out.println("Give the name of a country");
	 BufferedReader in= new BufferedReader(new InputStreamReader(System.in));
	 String str="";
	 str=in.readLine();
	 capital=myejb.capitalName(str);
	 System.out.println(capital);
		 }
		 catch(Exception e)
		 {
			 e.printStackTrace();
		 }
	 }


}
Properties prop=new Properties();
prop.put(Context.INITIAL_CONTEXT_FACTORY, "org.apache.openejb.client.RemoteInitialContextFactory");
prop.put("java.naming.provider.url", "ejbd://localhost:4201");
Context context = new InitialContext(prop);
CountryCapital myejb =(CountryCapital)context.lookup("CountryCapitalBeanRemote");
org.apache.openejb.client.RemoteInitialContextFactory to create the InitialContext. In this case as the EJB server is the naming service provider and has naming service runnning at Port 4201. So we need to specify the location of the EJB server. In this case it is ejbd://localhost:4201. Once this is done we have the context that provides us the ability to lookup and get objects.
Why is the lookup name CountryCapitalBeanRemote ??
This will be discussed in deploy and run section.
org.apache.openejb.client.RemoteInitialContextFactory class to the build path. This is because the application client needs this class to create the InitialContext as explained above.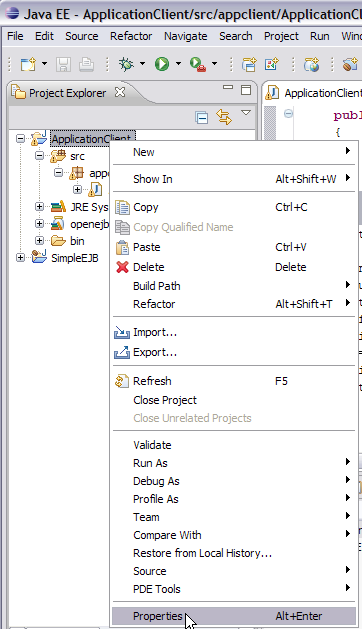
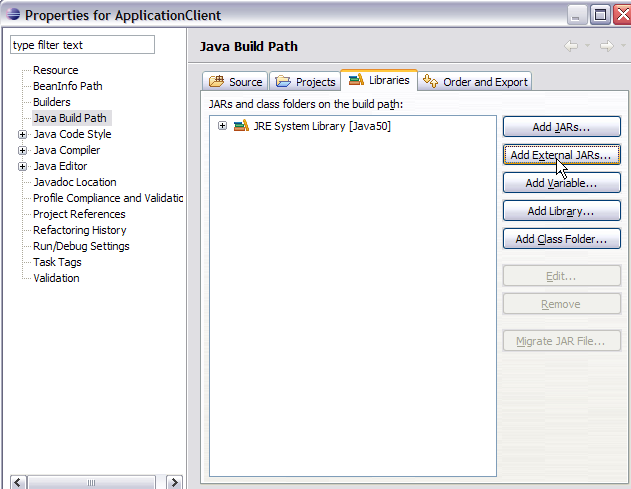
<GERONIMO_HOME>\repository\org\apache\openejb\openejb-client\3.0 and select the jar openejb-client-3.0.jar. Select OK.This completes the Application Client Development.
This section will take you through the deployment of the EJB application. Later we will run the application client with some sample inputs.
<GERONIMO_HOME>/var/log/geronimo.log and find the following:
18:16:39,750 INFO  [startup] Jndi(name=CountryCapitalBeanLocal) --> Ejb(deployment-id=SimpleEJB/CountryCapitalBean)
18:16:39,750 INFO  [startup] Jndi(name=CountryCapitalBeanRemote) --> Ejb(deployment-id=SimpleEJB/CountryCapitalBean)
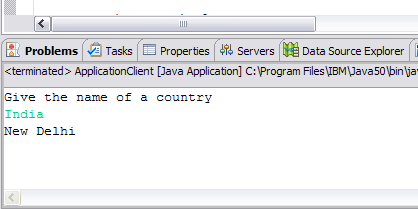
Sample Input #1: India
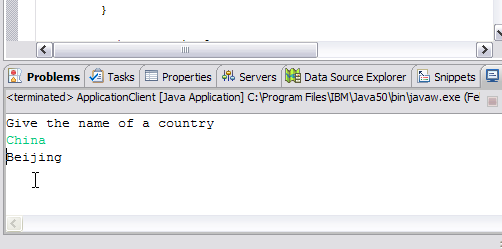
Sample Input #2: China
Sample Input #3: United States Of America

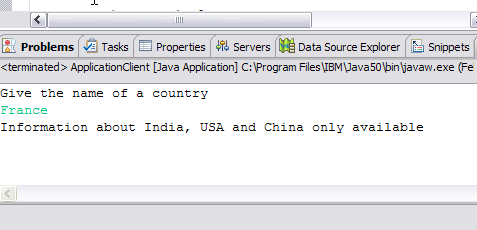
Sample Input #4: France
|
|
Privacy Policy - Copyright © 2003-2013, The Apache Software Foundation, Licensed under ASL 2.0. |